
.svg)

.jpg)
The entirety of the software world is united by the need to write tests, be it a unit test for backend or frontend code or an integration test for the entire application. If it’s a website, writing robust tests can check a lot of flows.
A decade back, when I was still in college, I came across tools like Selenium, which seemed like magic. A tool that can copy clicks on a website and then use that to mimic a series of human-like actions and automate a bunch of activities? I was sold. I remember using it to write a web scraper.
When I started working, the world had transitioned to Playwright, with all of its advantages. A major highlight is its ability to provide a recorder and code generation for generating tests. We’ll use this post to explore the different ways we can use Playwright recorder to generate tests for our use cases.
A quick search online will inform you that Playwright recorder is a tool that smooths the wrinkles in the process of generating tests by capturing all interactions with a browser and adding lines of code for each interaction
What Is Playwright Recorder?
A quick search online will inform you that Playwright recorder is a tool that smooths the wrinkles in the process of generating tests by capturing all interactions with a browser and adding lines of code for each interaction.
These lines of code can then be used as tests for the various interactions on the website. It comes loaded with a browser window for interactions and the Playwright Inspector for real-time code generation. As you perform natural web interactions—clicking buttons, filling in forms, and navigating pages—the Inspector automatically translates each action into clean, executable test code.
Let’s go over some ways we can use Playwright recorder to generate our tests and learn more about this tool along the way. Before we start with anything, you'll need the latest version of Node.js(20.x, 22.x, or 24.x) installed on your system.
Playwright Recording With the VS Code Extension
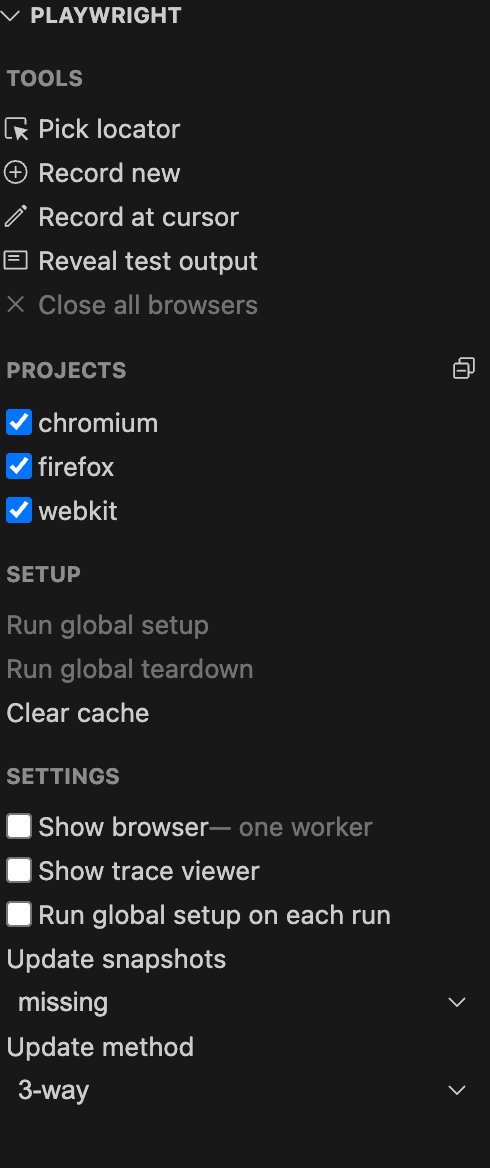
Visual Code Studio (VS Code) is a popular source code editor. And it comes with a plethora of plugins, one of which is an extension for Playwright recorder. It looks something like this:

Alt text: VS code playwright plugin
In order for the Playwright extension to work its magic, it requires playwright.config.js. This can be generated in the initial project scaffolding process:
# Create project directory
mkdir vscode-recording-demo
cd vscode-recording-demo

# Initialize Playwright project (installs @playwright/test)
npm init playwright@latest
The VS Code extension scans for playwright.config.js/ts to detect Playwright projects. It comes populated with a “projects” array, shown as follows:
projects: [
    {
      name: 'chromium',
      use: { ...devices['Desktop Chrome'] },
    },

    {
      name: 'firefox',
      use: { ...devices['Desktop Firefox'] },
    },

    {
      name: 'webkit',
      use: { ...devices['Desktop Safari'] },
    },

    /* Test against mobile viewports. */
    // {
    //   name: 'Mobile Chrome',
    //   use: { ...devices['Pixel 5'] },
    // },
    // {
    //   name: 'Mobile Safari',
    //   use: { ...devices['iPhone 12'] },
    // },

    /* Test against branded browsers. */
    // {
    //   name: 'Microsoft Edge',
    //   use: { ...devices['Desktop Edge'], channel: 'msedge' },
    // },
    // {
    //   name: 'Google Chrome',
    //   use: { ...devices['Desktop Chrome'], channel: 'chrome' },
    // },
  ],
This setting helps with different browsers for testing. The playwright.config.js also comes with certain flags like fullyParallel: true, which can be used to run tests concurrently across browsers.
Once we have the initial setup done, we can use the extension to record tests by going to View → Testing. In the window that opens up, you’d see an option to Record new.
Ensure that the Show browser checkbox is selected, so that when you click Record new, a browser opens up. For the content of this post, I tried testing using the todo website: https://demo.playwright.dev/todomvc/
My interactions generated the following code:
import { test, expect } from '@playwright/test';

test('test', async ({ page }) => {
  await page.goto('https://demo.playwright.dev/todomvc/#/');
  await page.getByRole('textbox', { name: 'What needs to be done?' }).fill('1. perform testing');
  await page.getByRole('textbox', { name: 'What needs to be done?' }).press('Enter');
  await page.getByRole('textbox', { name: 'What needs to be done?' }).fill('2. document results of testing');
  await page.getByRole('textbox', { name: 'What needs to be done?' }).press('Enter');
  await page.getByRole('link', { name: 'Active' }).click();
  await page.getByRole('link', { name: 'Completed' }).click();
  await page.getByRole('link', { name: 'All' }).click();
  await page.getByRole('listitem').filter({ hasText: 'perform testing' }).getByLabel('Toggle Todo').check();
  await page.getByRole('link', { name: 'Completed' }).click();
  await page.getByRole('link', { name: 'Active' }).click();
  await page.getByRole('link', { name: 'All' }).click();
  await page.getByRole('button', { name: 'Clear completed' }).click();
  await page.getByRole('button', { name: 'Delete' }).click();
  await page.getByRole('button', { name: 'Delete' }).click();
});
When I tried running the test, it failed:

Upon further inspection, I figured out that the Delete button requires hovering over the todo item first, so I fixed it by changing the code to:
import { test, expect } from '@playwright/test';

test('test', async ({ page }) => {
  await page.goto('https://demo.playwright.dev/todomvc/#/');
  await page.getByRole('textbox', { name: 'What needs to be done?' }).fill('1. perform testing');
  await page.getByRole('textbox', { name: 'What needs to be done?' }).press('Enter');
  await page.getByRole('textbox', { name: 'What needs to be done?' }).fill('2. document results of testing');
  await page.getByRole('textbox', { name: 'What needs to be done?' }).press('Enter');
  await page.getByRole('link', { name: 'Active' }).click();
  await page.getByRole('link', { name: 'Completed' }).click();
  await page.getByRole('link', { name: 'All' }).click();
  await page.getByRole('listitem').filter({ hasText: 'perform testing' }).getByLabel('Toggle Todo').check();
  await page.getByRole('link', { name: 'Completed' }).click();
  await page.getByRole('link', { name: 'Active' }).click();
  await page.getByRole('link', { name: 'All' }).click();
  await page.getByRole('button', { name: 'Clear completed' }).click();

  // Fixed: Added hover to reveal delete button
  await page.getByRole('listitem').filter({ hasText: '2. document results of testing' }).hover();
  await page.getByRole('listitem').filter({ hasText: '2. document results of testing' }).getByRole('button', { name: 'Delete' }).click();
});
And voilà! We now have our fully working tests!
Playwright Recording With the Inspector
This is similar to what we did earlier, with the only caveat being that we can run a direct command to work with the browser and recorder tool as follows:
npx playwright codegen --output inspector-recorded.spec.js demo.playwright.dev/todomvcHere, the --output parameter is followed by the file name, which will have the recorded code.
The generated code is similar to what we had for the previous example and comes with the same issue around Delete as well. Some folks may prefer it for its simplicity, as it’s a command-line tool.
Modern Playwright versions also include enhanced assertion methods like toBeVisible() which provide more reliable element visibility checks compared to traditional text-based assertions, especially useful when testing across different authentication states. In order to activate this, you can click on the little eye icon in your recording window

This will add a visibility assertion, when you click an element in the browser. Something like this:
import { test, expect } from '@playwright/test';

test('test', async ({ page }) => {
  await page.goto('https://demo.playwright.dev/todomvc/#/');
  await expect(page.getByRole('link', { name: 'real TodoMVC app.' })).toBeVisible();

  await page.locator('html').click();
  await expect(page.getByRole('textbox', { name: 'What needs to be done?' })).toBeVisible();
});
Emulating Different Environments With Playwright Codegen
To take the above CLI method a step further, we can explore a variety of its features, one of which is the ability to provide a multitude of browser/device simulations. For instance, if you want to test how a certain UI layout will look and behave on iPhone, you can execute a command as follows:
npx playwright codegen --device "iPad" --output tests/tablet-recording.spec.js demo.playwright.dev/todomvcIt can generate code as follows:
import { test, expect, devices } from '@playwright/test';

test.use({
  ...devices['iPhone 13'],
});

test('test', async ({ page }) => {
  // Mobile-optimized interactions recorded here
  await page.goto('https://demo.playwright.dev/todomvc/');
  // Test runs in iPhone 13 viewport (390x844)
});
You can pass a variety of parameters to the command, such as viewport size, browsers, color schemes, geolocations, time zones, languages, etc. This is very useful in generating a wide variety of tests for various usability and accessibility issues.
Playwright comes loaded with options like --save-storage and --load-storage that come in handy when one would potentially need to enter credentials to run tests every time
Locating Authentication State
We’ve discussed a wide array of ways that Playwright recorder is a life-saving utility. But what about websites that require authentication? How does one generate tests for such websites?
Playwright comes loaded with options like --save-storage and --load-storage that come in handy when one would potentially need to enter credentials to run tests every time. This saves the hassle and allows for running the tests without any user interference.
To try this option, let’s explore an example:
npx playwright codegen --save-storage playwright/.auth/github-auth.json --output tests/github-login.spec.js https://github.com/loginThis’ll save the authentication credentials in the github-auth.json file. You should also add the following code to the playwright.config.js/ts:
export default defineConfig({
  projects: [
    {
      name: 'chromium',
      use: {
        ...devices['Desktop Chrome'],
        // Use recorded auth state automatically
        storageState: 'playwright/.auth/github-auth.json',
      },
    },
    // Similar config for firefox, webkit...
  ],
});
Once you’ve run the Playwright command, your generated code will look as follows:
import { test, expect } from '@playwright/test';

test('test', async ({ page }) => {
  await page.goto('https://github.com/login');
  await page.getByLabel('Username or email address').click();
  await page.getByLabel('Username or email address').fill('email_address’');
  await page.getByLabel('Password').click();
  await page.getByLabel('Password').fill('password');
  await page.getByRole('button', { name: 'Sign in', exact: true }).click();
  await page.getByRole('button', { name: 'Verify' }).click();
});
Now this storageState can be reused for other tests involving github.com. Let’s create a test file named github-authenticated.spec.js, as follows:
import { test, expect } from '@playwright/test';

// This test uses the recorded GitHub auth state from codegen recording
test('access GitHub settings without manual login', async ({ page }) => {
  await page.goto('https://github.com/settings');
  await expect(page.locator('h1')).toContainText('Public profile');
});

test('access GitHub repositories', async ({ page }) => {
  await page.goto('https://github.com/settings/repositories');
  await expect(page.locator('h1')).toContainText('Repository default branch');
});
You can run this test using this command:
npx playwright test tests/github-authenticated.spec.jsThis makes it very easy to write end-to-end tests for different flows on a website that requires authentication, without the hassle of adding the authentication flow every single time.
There is another useful feature where in passing the --user-data-dir flag in the codegen command lets you define a custom directory to store browser profile information. This proves particularly beneficial for preserving persistent browsing states, such as login credentials and user settings, across different codegen runs or for working with an existing browser profile.
For instance, I used it in a todo-app and it saved the state of my TODOs for the next session, thus I can potentially carry on writing new set of tests with my old data, without having to re-create the same website/application state again and again.
If I used it with a website that needed authentication, it would have saved that as well. To try this feature, we can use the following commands:
# First session - creates profile
npx playwright codegen --user-data-dir=./browser-profile --output ./session1.spec.js https://demo.playwright.dev/todomvc/

# Second session - reuses profile (todos persist!)
npx playwright codegen --user-data-dir=./browser-profile --output ./session2.spec.js https://demo.playwright.dev/todomvc/
In my second session, the recording browser looked like this:

Notice how the state of TODOs are from my first session and my code is in a new file.
Conclusion
We explored several ways Playwright recorder can be used to generate tests and the various features that help. But did you see the catch? We had to fix the code for it to be fully usable.
This is where platforms like Autify Nexus shine. Not only do they allow you to use natural language while their recorder captures it as an editable test, they also promise a “Low-Code When You Want It, Full-Code When You Need It” feature, thus giving you absolute power over your code.
They also provide a “fix with AI” feature, which can be used on anything you deem necessary to fix, therefore making fixes like we saw earlier smoother. But unlike a lot of other tools, it doesn’t force the AI to fix preemptively, which means you still have leverage in situations where you feel a certain failure is absolutely necessary. Autify also helps you integrate with the cloud, enabling shared access and faster iterations.
Ready to experience AI-powered test automation? Explore Autify Nexus →


