
.svg)


Playwright is a popular open-source automation tool that allows end-to-end testing across multiple browsers, including Chromium (Chrome, Edge, Opera), WebKit (Safari), and Firefox. It improves browser interactions and provides quick, reliable, automated tests for web applications.
What makes Playwright very successful in testing is its unique qualities, which include:
- Auto-wait feature: The auto-wait feature in Playwright waits for elements to be ready (e.g., visible, clickable) before executing actions, avoiding the need for manual delays and ensuring stable tests.
- Cross-browser compatibility: It supports all major browsers, allowing for consistent testing across different environments.
- Multi-language support: Playwright enables developers to write tests in their preferred programming language, such as JavaScript, TypeScript, Python, Java, and .NET.
In this post, we'll explore how Playwright and JavaScript work together to produce efficient and effective automated tests.
Because JavaScript is the primary language for web development (particularly front end), writing Playwright tests in the same language feels natural
Benefits of Using Playwright and JavaScript Together
As previously stated, Playwright supports various languages such as Python, Java, and .NET; however, Playwright with JavaScript has unique advantages.
- Native to web development: Because JavaScript is the primary language for web development (particularly front end), writing Playwright tests in the same language feels natural.
- Easy adoption for front end developers: Front end developers are familiar with JavaScript, so they can easily start writing tests without learning a new language.
- Robust debugging tools: The JavaScript debugging tools (DevTools) integrate well with Playwright, making it easy to find and resolve errors in your tests.
- Asynchronous programming: Playwright uses JavaScript's async/await syntax to handle asynchronous browser interactions, making tests cleaner and easier to create compared to other languages.
Getting Started With Playwright and JavaScript
In this section, we'll go over how to install and use Playwright with JavaScript for automated testing.
Prerequisites
To follow along with this tutorial, you should have the following:
- Node.js installed on your computer (Playwright runs on Node.js)
- A code editor, preferably Visual Studio Code (VS Code), for a smooth development experience
- Basic knowledge of JavaScript
- Multiple web browsers installed, such as Chrome, Firefox, and Safari (if you’re using macOS), to test cross-browser compatibility
Installing Playwright
After you've installed Node.js, VS Code, and the necessary web browsers, you can proceed to install and configure Playwright. To get started, follow these steps:
1. Create a Project Folder
Create a folder in your preferred location on your computer. Open the folder in VS Code.
2. Install Playwright
Open the VS Code terminal and run this command:
npm init playwright@latestYou’ll be prompted to choose between TypeScript and JavaScript. Since we’re working with JavaScript, use the arrow keys to select JavaScript and press Enter.
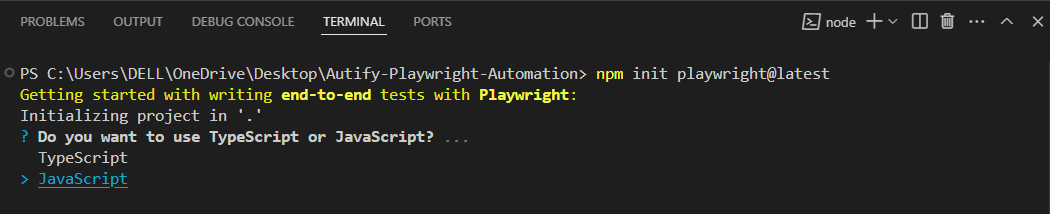
Choose between TypeScript and JavaScript
3. Set Up the Test Folder
You’ll be asked to specify a folder for your test. You can either accept the default tests folder or provide a custom name.
4. Add GitHub Actions Workflow (Optional)
You’ll also be prompted to add a GitHub Actions workflow. Press y for true or n for false, depending on whether you want to set up CI/CD integration.
5. Install Playwright Browsers
Finally, you’ll be asked if you want to install Playwright browsers. Choose y to install them now or n to skip and install them manually later.
6. Verify Installation
Once the installation is complete, your project structure should look similar to this:
project-folder/
├── node_modules/
├── tests/
├── package-lock.json
├── package.json
├── playwright.config.js
└── ...
All Playwright configuration is done in the playwright.config.js file. This file allows you to define settings and options for your test suite. The configuration file has some default settings but is highly customizable, so you can tweak it to fit your project’s needs.

Creating Your First Test With Playwright and JavaScript
Now, let’s create the first test with Playwright. Create a new file within your test folder with the extension .spec.js. Then, add the following code:
const { test } = require('@playwright/test');

test("Autify Contact Page", async ({ page })=> {
    await page.goto("https://autify.com/contact-us");
});
The above code is a simple Playwright test script that navigates to Autify’s contact page. Let’s break it down step by step.
const { test } = require('@playwright/test');
- This line imports a test function from the Playwright test library. The function is used to define individual test cases.
test("Autify Contact Page", async ({ page })=> {- The above line defines a test case. The test function takes two arguments: the name of the test case (in this case, “Autify Contact Page”) and a callback function.
- The async keyword indicates that the test function is asynchronous, meaning it will perform actions that take time (like navigating to a webpage).
- The {page} argument inside the callback function is a fixture provided by Playwright. It represents a browser page where the test will run.
await page.goto("https://autify.com/contact-us");- The await keyword ensures that the script waits for the page to load fully before proceeding to the next step.
- page.goto() is a Playwright method used to navigate to a specific URL. For this example, it’ll navigate to https://autify.com/contact-us.
Running Playwright Test
To run your Playwright tests, use the following command:
npx playwright testThis will execute your tests and display the results in the terminal, indicating whether they passed or failed.
If you want to see the tests running in the browser, you have two options:
1. Use the --headed flag
Add the --headed flag to the command to run tests in headed mode (with the browser UI visible):
npx playwright test --headed2. Update the Configuration File
Alternatively, you can modify the playwright.config.js file to always run tests in headed mode. Set the headless property inside the use object to false:
use: {
    headless: false,
},
If everything is set up correctly, after running your test, a web browser should open, navigate to the Autify contact page, and then close immediately. You should also see an output similar to this in your terminal:
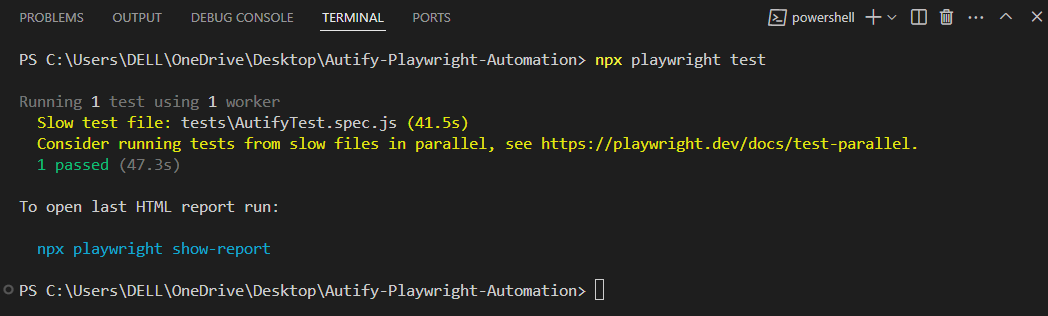
You can see that the test passed, and the entire process was completed in 47.3 seconds.
Browser Automation With Playwright and JavaScript
In this section, we'll write a simple test that programmatically uses Playwright and JavaScript to control a web browser. It'll cover tasks like navigating webpages and interacting with elements, such as filling out forms and clicking buttons.
We’ll use Autify's homepage and Facebook's login page as examples. Here’s what the code looks like:
const { test, expect } = require('@playwright/test');

test("Autify Hero Section", async ({ page })=> {
    // Go to the login page
    await page.goto("https://autify.com/");

    // Target h1 text on the page
    const h1Text = await page.getByRole('heading', { name: 'AI Platform for Software Testing' }).textContent();

    // Check if the text content is "AI Platform for Software Testing"
    await expect(h1Text).toBe("AI Platform for Software Testing");
});


test("Automate Facebook Login", async ({ page })=> {
    // Go to the login page
    await page.goto("https://www.facebook.com/?_rdc=1&_rdr#");

    // Enter email or phone number
    await page.getByPlaceholder('Email or phone number').fill("test@test.com");

    // Enter password
    await page.getByPlaceholder('Password').fill("12345");

    // Click Log in button
    await page.getByRole('button', { name: 'Log in' }).click();
});
If everything works perfectly, your output should look something like this:

Let’s try to understand the above code. We have two test cases: The first test case is automating Autify’s hero section, while the second test case is automating Facebook login inputs.
1. Autify Hero Section Test
- Navigates to Autify’s homepage.
- Retrieves the text content of the <h1> element.
- Asserts that the text matches "AI Platform for Software Testing."
2. Facebook Login Test
- Navigates to Facebook’s login page.
- Fills in the email and password fields.
- Clicks the Log In button.
Key Methods Used
- page.goto(url): Navigates to the specified URL.
- page.getByRole(role): Locate elements based on their ARIA role or optional attribute.
- page.getByPlaceholder(text): Locate input fields based on their placeholder texts.
- fill(value): Fills an input field with the specified value.
- click(): Clicks an element on the page.
- expect(value).toBe(expected): Asserts that a value matches the expected result.
Using Playwright with GitHub Actions for CI/CD
Playwright integrates seamlessly with GitHub Actions, enabling you to automate your end-to-end tests as part of your CI/CD pipeline. Setting up a GitHub Actions workflow allows you to run Playwright tests on every push or pull request, ensuring your application remains bug-free.
To get started, you can refer to the official Playwright GitHub Actions documentation for detailed instructions and examples.
When using Playwright with JavaScript, you need to adhere to some best practices to ensure maintainable, reliable, and efficient test suites
Best Practices for Using Playwright and JavaScript
When using Playwright with JavaScript, you need to adhere to some best practices to ensure maintainable, reliable, and efficient test suites. Here are some recommendations:
1. Leverage Async/Await
Use async/await to handle asynchronous operations. This makes your code more readable and easier to debug.
Example:
test('Login test', async ({ page }) => {
    const loginPage = new LoginPage(page);
    await loginPage.navigate();
    await loginPage.login('user', 'pass');
});
2. Use Playwright’s Auto-Wait Feature
Avoid adding manual waits and rely on Playwright’s built-in auto-wait to ensure elements are ready before interactions.
3. Take Screenshots and Videos for Debugging
Capture screenshots or videos of test failures for easier debugging.
Example:
test('Test name', async ({ page }) => {
    try {
        // Test code
    } catch (error) {
        await page.screenshot({ path: 'screenshot.png' });
        throw error;
    }
});
4. Integrate with CI/CD
Integrate Playwright tests into your CI/CD pipelines to automate testing on every code change. Utilize environment variables to manage configurations and credentials in different environments.
Conclusion
Combining Playwright with JavaScript provides a powerful and seamless solution for browser automation and testing. JavaScript, being a browser-native language and easy to learn, is an ideal choice for writing Playwright tests compared with other programming languages.
By following the best practices outlined in this post, you can ensure smooth and efficient testing workflows, much like the seamless experience offered by Autify, a low-code test automation platform.
Autify empowers teams to automate their testing processes effortlessly, ensuring high-quality software delivery without the need for extensive coding expertise.
For more insights into low-code test automation, explore Autify’s platform and see how it can transform your testing workflow.


