In automated testing, handling timeouts effectively is crucial to maintaining robust and reliable test suites. Playwright, a modern end-to-end testing framework, provides various timeout configurations to help developers manage test execution. This tutorial covers Playwright timeouts, explaining their mechanisms and offering practical examples for resolving timeout errors.
Whether you're troubleshooting a specific error like "Timeout 30000ms exceeded" or fine-tuning timeout settings for efficient test execution, this guide will help you master Playwright's timeout capabilities.
What Is a Playwright Timeout?
Timeouts in Playwright refer to the maximum time the framework waits for a specific action or event to occur. If the event does not occur within the allotted time, Playwright throws an error. Understanding how Playwright handles timeouts is essential for debugging and maintaining reliable test cases.
Overview of Playwright Timeout
Playwright’s timeout mechanism governs how long a test or specific operation should wait before it is considered a failure. By default, Playwright includes a 30-second timeout for most actions, but this is customizable. Timeouts typically apply to:
- Page interactions: Actions like clicking, typing, or waiting for elements to appear.
- Assertions: Verifications such as ensuring an element contains the expected text.
- Test execution time: The total time allowed for a test to complete.
Navigation: Loading web pages or waiting for specific URLs to resolve.
Understanding where and how these timeouts apply helps identify bottlenecks in test execution and fine-tune automation scripts.
Common Timeout Errors in Playwright
1. TimeoutError: waiting for selector #element failed
This occurs when Playwright cannot find an element within the specified time.
await page.waitForSelector('#element', { timeout: 5000 });2. Timeout 30000ms exceeded
This indicates that an operation (e.g., navigation or test execution) exceeded the default 30-second timeout.
Error: Timeout 30000ms exceeded while waiting for selector "#loginButton"3. Navigation Timeout Exceeded
If a page fails to load within the set duration, Playwright throws a navigation timeout error:
await page.goto('https://example.com', { timeout: 45000 });4. Global Timeout Errors
These occur when the entire test suite exceeds the globally defined timeout.
Understanding Playwright's Timeout Mechanism With Examples
Playwright offers robust and configurable timeout settings that help manage various aspects of test execution. This ensures efficiency and predictability. Let’s go through the different types of timeouts, their use cases, and how to configure them effectively with examples.
Examples of Playwright Timeout and How to Handle Them
Timeouts can occur for various reasons, such as slow network responses, heavy DOM manipulations, or unexpected delays in application behavior. Below are practical examples of timeout scenarios and how to handle them:
Handling Locator Timeout
Imagine a scenario where Playwright is waiting for a button to become visible, but the button takes too long to appear:
import { test, expect } from '@playwright/test';
test('Click submit button with timeout', async ({ page }) => {
await page.goto('https://example.com');
try {
// Attempt to click the submit button with a timeout of 5000ms (5 seconds)
await page.locator('button#submit').click({ timeout: 5000 });
} catch (error) {
// Catch and log timeout errors
console.error('Locator timeout exceeded:', error.message);
}
});
In this example, a timeout of 5000ms is set for the click() action. If the button does not appear within that time frame, an error will be thrown. To handle such cases, ensure the timeout value aligns with the application’s expected response time or debug the underlying delay.
Waiting for API Responses
Playwright can wait for network requests to complete before proceeding. This is useful in scenarios where a page depends on an API response before rendering critical UI elements, such as loading user data after login.
For example:
A web application where a user logs in, and the dashboard needs to fetch their profile information from an API before displaying it. If the test attempts to interact with the dashboard before the API response arrives, it may fail due to missing or incomplete elements.
To ensure the UI is ready before interaction, we can wait for the API response like this:
await page.waitForResponse(
(response) => response.url().includes('/api/user-profile') && response.status() === 200,
{ timeout: 10000 }
);
This example waits for the /api/user-profile call to return a 200 status within 10 seconds. If the response is delayed, Playwright throws a timeout error. This approach ensures that the test only proceeds once the necessary data is available and helps prevent interacting with incomplete or missing UI elements caused by slow network responses. It reduces flakiness and improves reliability.
Customizing Timeout for Assertions
Assertions can also be customized with timeouts to ensure expected conditions are met:
await expect(page.locator('h1')).toHaveText('Welcome', { timeout: 7000 });This example configures a 7-second timeout for verifying that the <h1> element contains the text "Welcome."
Configurable Timeouts in Playwright Test
Timeouts in Playwright are highly customizable, allowing you to set time limits for various test components, including individual tests, assertions, page actions, and the entire test suite. Understanding and configuring these timeouts can prevent flaky tests and streamline debugging. Here are several types of timeouts that Playwright offers:
- Test Timeout: Sets the maximum duration for an entire test.
- Expect Timeout: Specifies the timeout for assertions made using the expect API.
- Global Timeout: Limits the total time Playwright will run tests before exiting.
- Navigation Timeout: Configures the maximum time Playwright waits for page navigation to complete.
- Locator Timeout: Defines how long Playwright should wait for an element to appear or perform an action.
Default Timeout for Each Test
By default, Playwright assigns a 30-second (30000ms) timeout to each test. This default setting works for most cases but can be modified globally or overridden for specific tests. This value is often sufficient for most scenarios but can be adjusted if your application requires longer waits due to factors such as API calls, complex DOM updates, or animations.
Setting Test Timeout in Configuration
To modify the default test timeout, update the playwright.config.ts file:
import { defineConfig } from '@playwright/test';

// Export the Playwright configuration with a custom timeout setting
export default defineConfig({
timeout: 60000, // Sets the default test timeout to 60 seconds
});
This configuration sets the global test timeout to 60 seconds, allowing longer tests to complete without interruption.
Setting Timeout for a Single Test
For scenarios where only a specific test requires a different timeout, use the test.setTimeout method within your test file:
import { test, expect } from '@playwright/test';

// Define a test case
test('example test', async ({ page }) => {
// Set the timeout to 45 seconds for this specific test
test.setTimeout(45000);

// Navigate to the example website
await page.goto('https://example.com');

// Test actions here
});
This approach ensures that only the specified test has its timeout adjusted. It leaves other tests unaffected.
Expect Timeout
Assertions in Playwright, made using the expect function, have their timeout settings. The default is 5 seconds. To modify this globally, adjust the configuration:
import { defineConfig } from '@playwright/test';

// Export the Playwright configuration with a custom expect timeout setting
export default defineConfig({
expect: {
timeout: 10000, // Sets expect timeout to 10 seconds
},
});
For individual assertions, specify the timeout directly as follows:
import { test, expect } from '@playwright/test';

// Define a test case
test('example test', async ({ page }) => {
// Navigate to the example website
await page.goto('https://example.com');

// Check if the 'Submit' button is visible within 7 seconds
await expect(page.locator('text=Submit')).toBeVisible({ timeout: 7000 }); // 7 seconds
});
Adjusting assertion timeouts is particularly useful when dealing with elements that may take varying times to appear.
Global Timeout
The global timeout dictates the maximum duration for the entire test suite execution. This is especially useful in continuous integration environments to prevent hangs. Set it in the configuration file as follows:
import { defineConfig } from '@playwright/test';

export default defineConfig({
globalTimeout: 3600000, // Sets global timeout to 1 hour
});
This setting ensures that the test suite does not run longer than the specified time, aiding in resource management.
Action and Navigation Timeouts
While Playwright does not impose default timeouts on actions and navigations, setting them can be beneficial for operations expected to take longer, as shown below:
import { defineConfig } from '@playwright/test';

// Export the Playwright configuration with action and navigation timeout settings
export default defineConfig({
use: {
actionTimeout: 10000, // 10 seconds for actions
navigationTimeout: 30000, // 30 seconds for navigations
},
});
Alternatively, set timeouts for specific actions:
import { test, expect } from '@playwright/test';

// Define a test case
test('example test', async ({ page }) => {
// Navigate to the example website with a 30-second timeout
await page.goto('https://example.com', { timeout: 30000 }); // 30 seconds

// Click the 'Login' button with a 5-second timeout
await page.click('text=Login', { timeout: 5000 }); // 5 seconds
});
Tailoring these timeouts helps manage operations prone to delays, such as network-dependent actions.
When encountering timeout errors in Playwright, debugging effectively is crucial to resolving them quickly.
Debugging Timeout Issues in Playwright
When encountering timeout errors in Playwright, debugging effectively is crucial to resolving them quickly. Here are some key strategies:
1. Playwright Trace Viewer
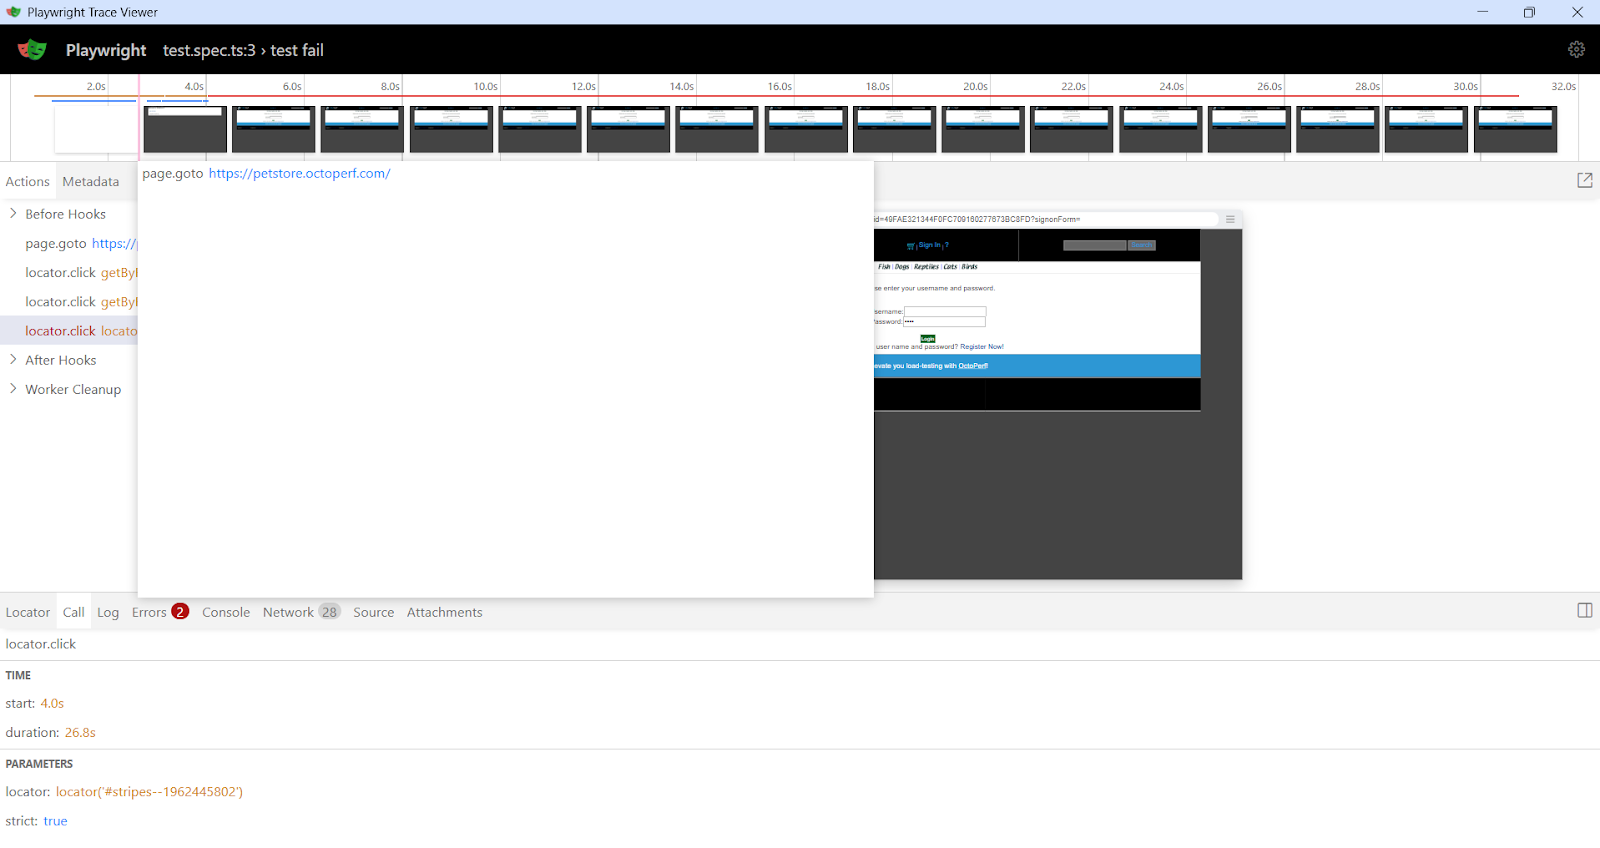
One of the most powerful tools for debugging Playwright tests is the Trace Viewer. This tool provides a detailed trace of test execution, including network requests, console logs, and snapshots at each step.
Enable Tracing in Your Test
Modify your Playwright test to record a trace by adding the following configuration:
import { test } from '@playwright/test';
test.use({ trace: 'on' });
This ensures that a trace file is generated every time your test runs. Alternatively, you can enable tracing in the playwright.config.ts file:
import { defineConfig } from '@playwright/test';
export default defineConfig({
retries: process.env.CI ? 2 : 0, // Set to 2 when running on CI
// ...
use: {
trace: 'on-first-retry', // Record traces on the first retry of each test
},
});
The playwright.config file is preconfigured to generate a trace.zip file for each test. The trace.zip file is stored in the test-results folder. Traces run only on the first retry of a failed test.
Additionally, retries are set to 2 in CI environments and 0 when running locally. This means traces won’t be recorded during the first test run or the second retry—only on the first retry after a failure.
Run Your Test with Tracing Enabled
Execute your test as usual:
npx playwright test
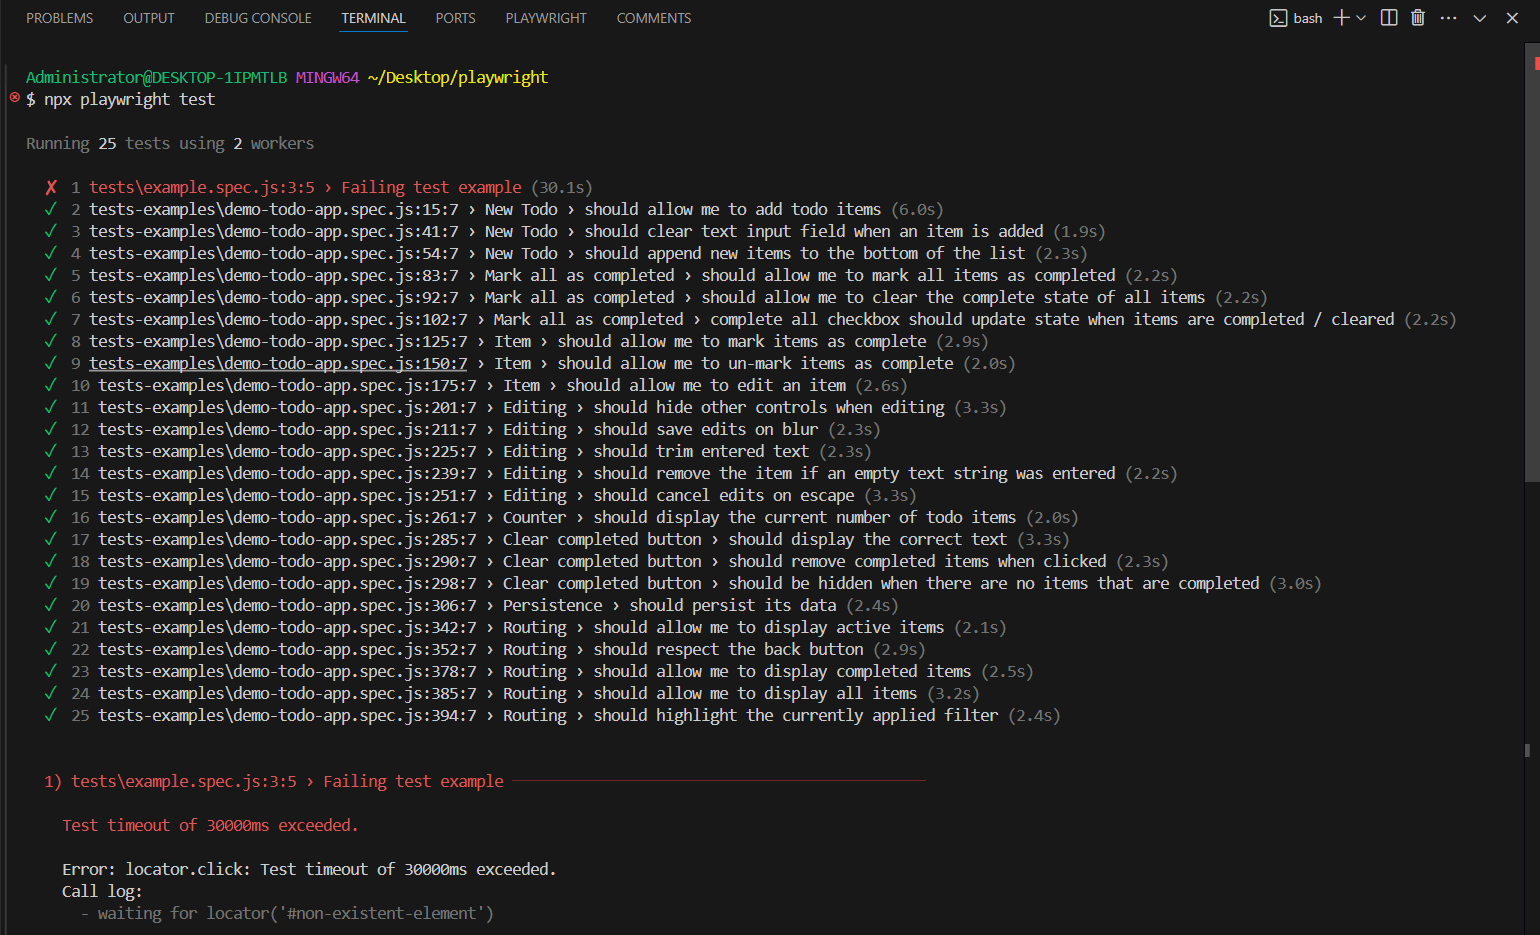
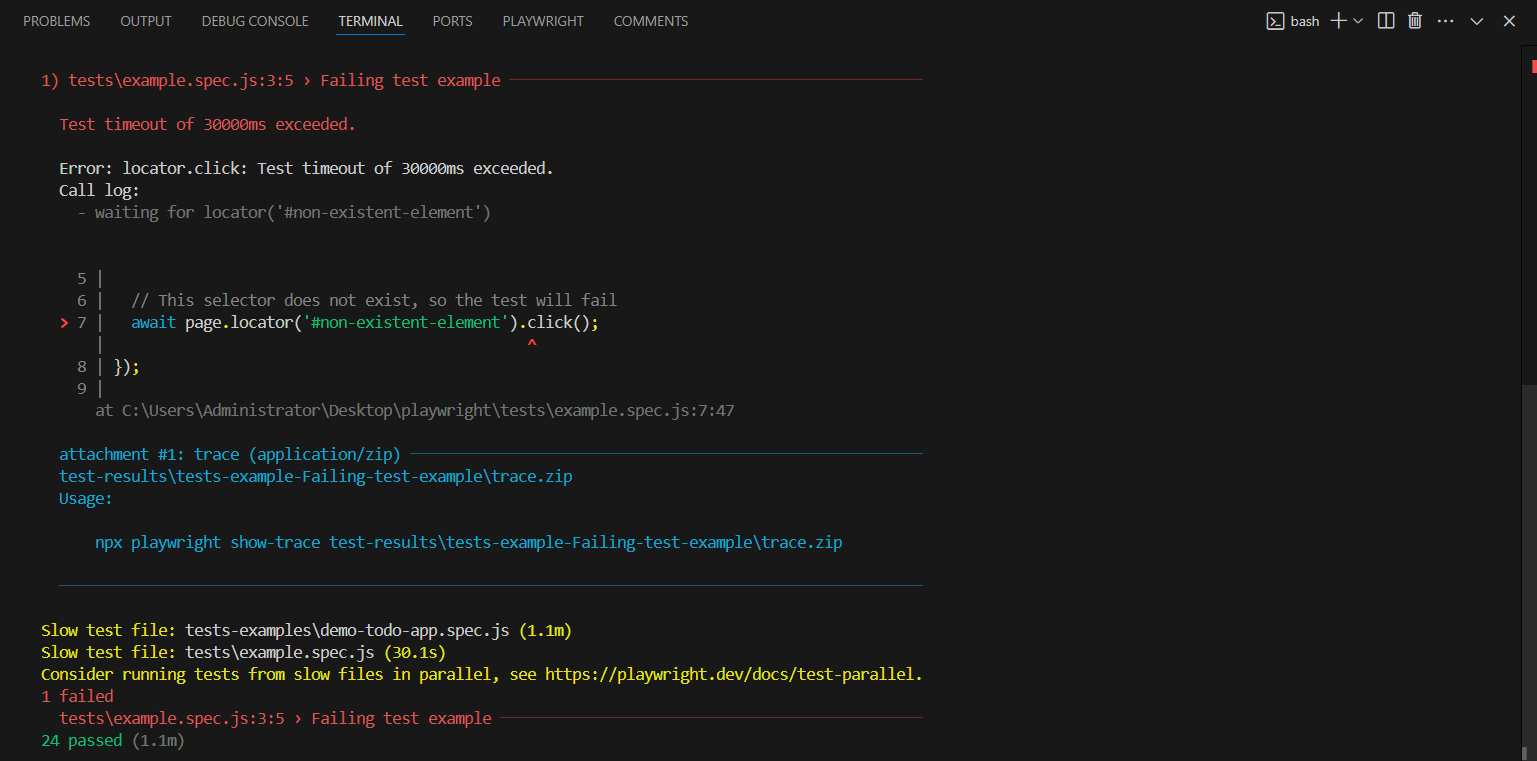
If a test fails, Playwright will automatically generate a trace file named trace.zip.
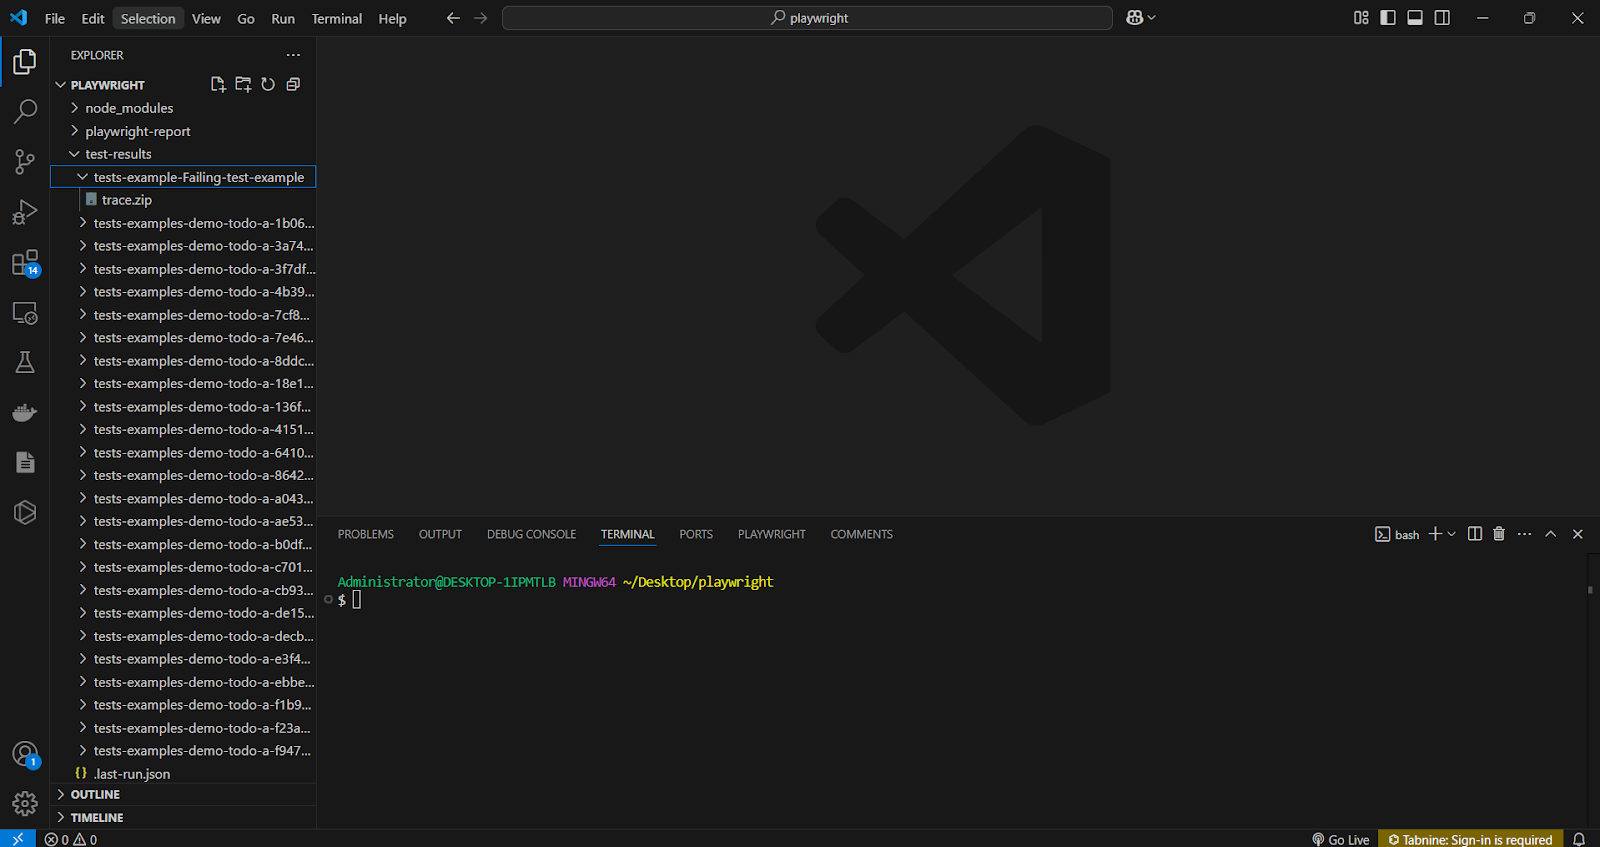
Open and Analyze Trace Viewer
You can view a saved trace using the Playwright CLI or by accessing it in a browser. Ensure you provide the complete path to the directory where your trace.zip file is stored.
npx playwright show-trace path/to/trace.zip
Viewing the HTML Report
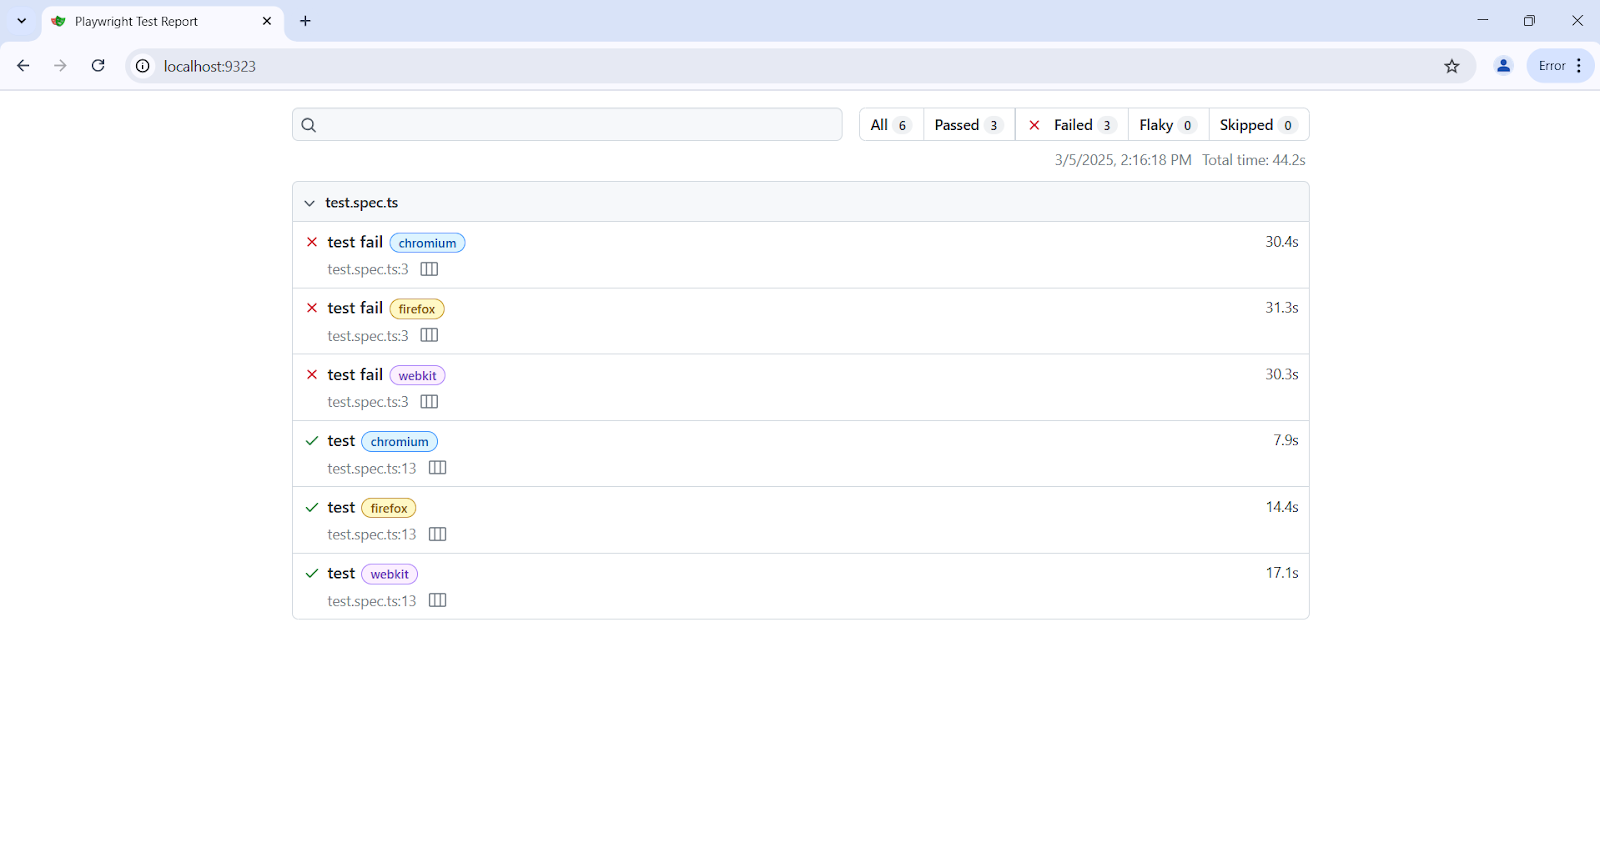
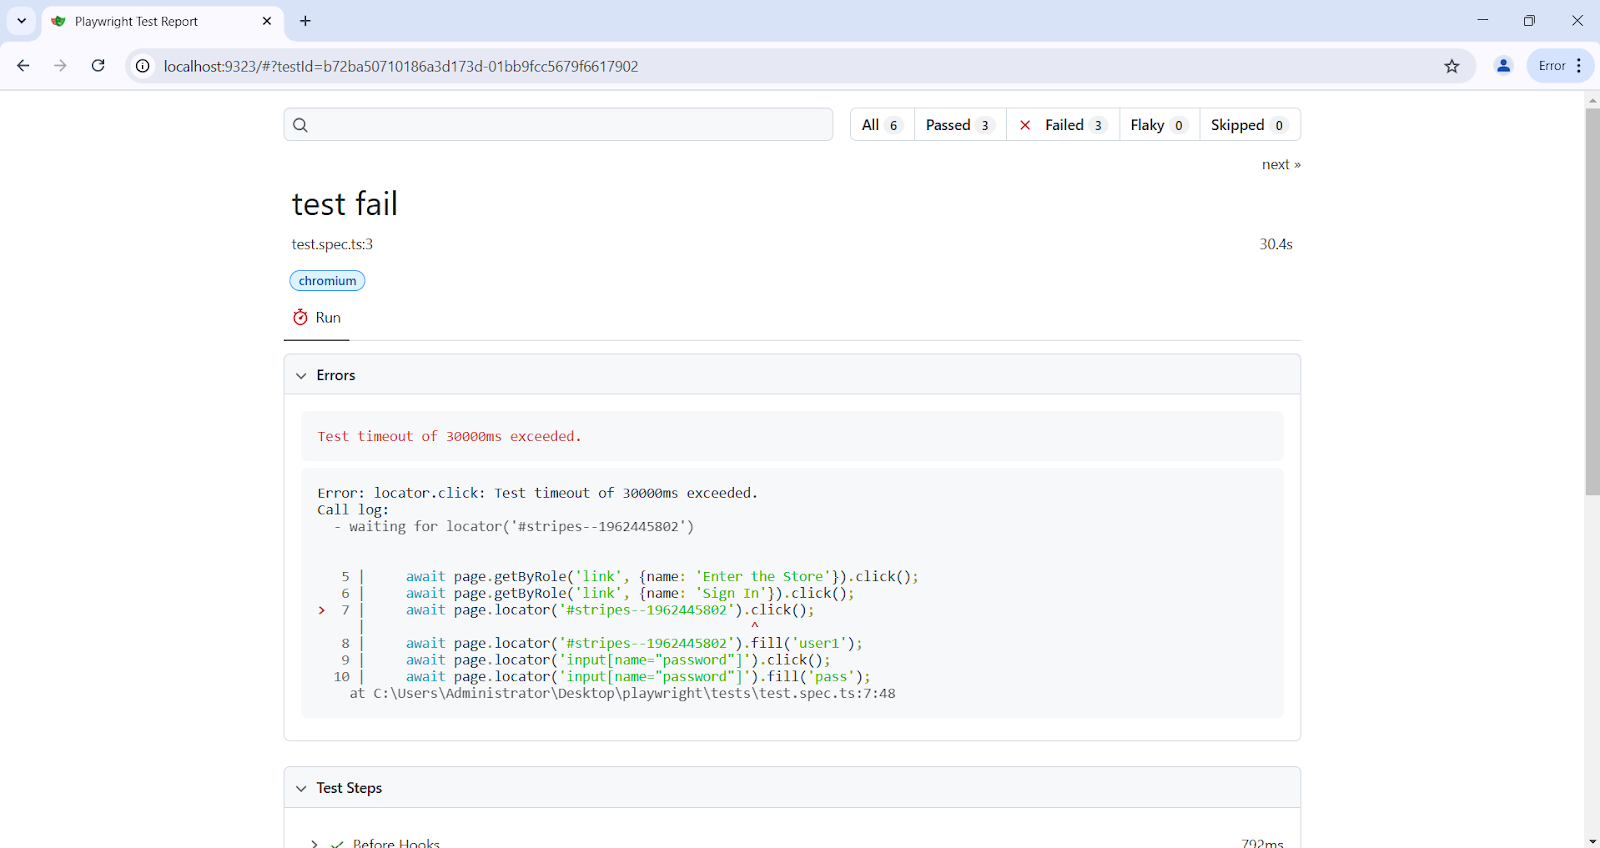
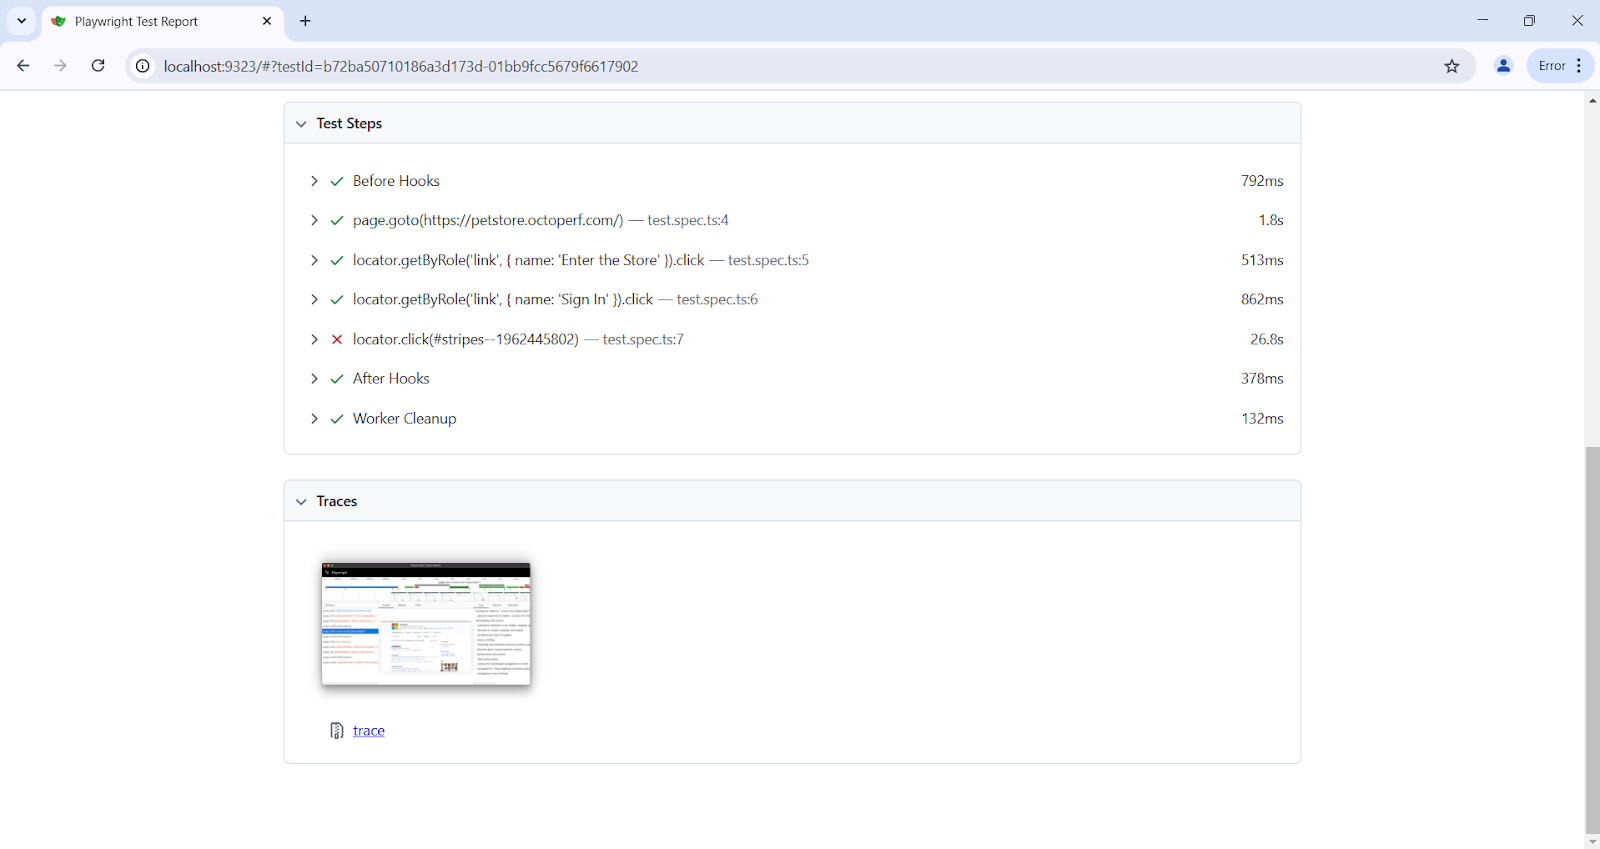
The HTML report provides a comprehensive summary of all executed tests, including the browsers used and the duration of each test. You can filter tests by passed, failed, flaky, or skipped results, as well as search for specific test cases. Clicking on a test opens a detailed view, displaying crucial information such as errors, test steps, and traces.
To open the report, run:
npx playwright show-report
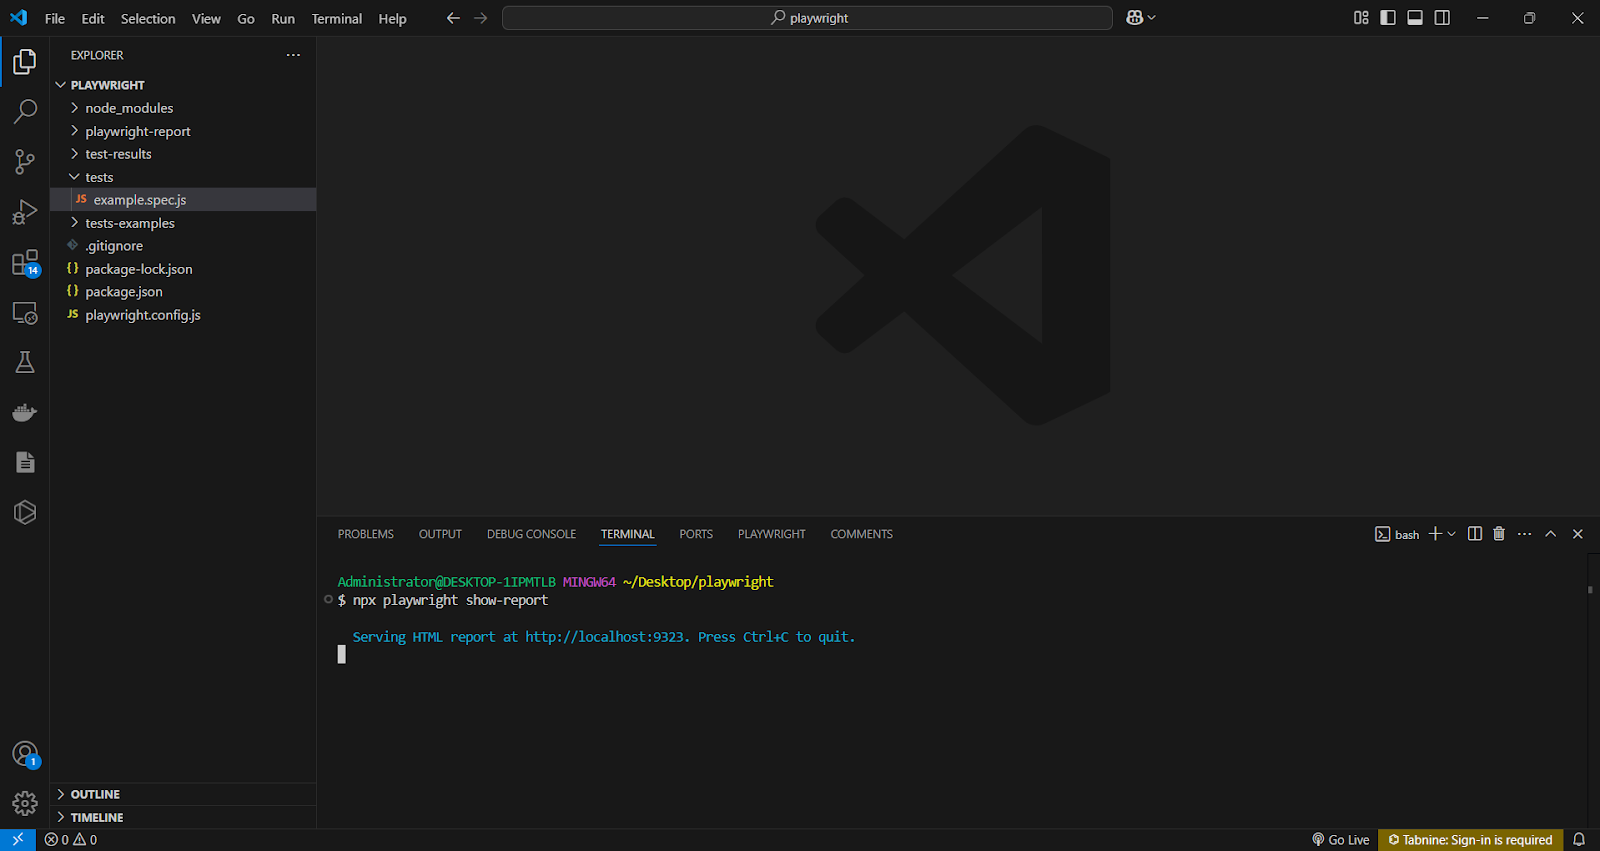
This will launch Playwright's Trace Viewer, allowing you to:
- View snapshots of each test step.
- Examine network requests and responses.
- Inspect console logs and errors.
- Analyze timeout issues and element visibility.
Step-by-Step Guide: Resolving Common Timeout Errors with Trace Viewer
If you encounter a timeout error like:
TimeoutError: waiting for selector #non-existent-element
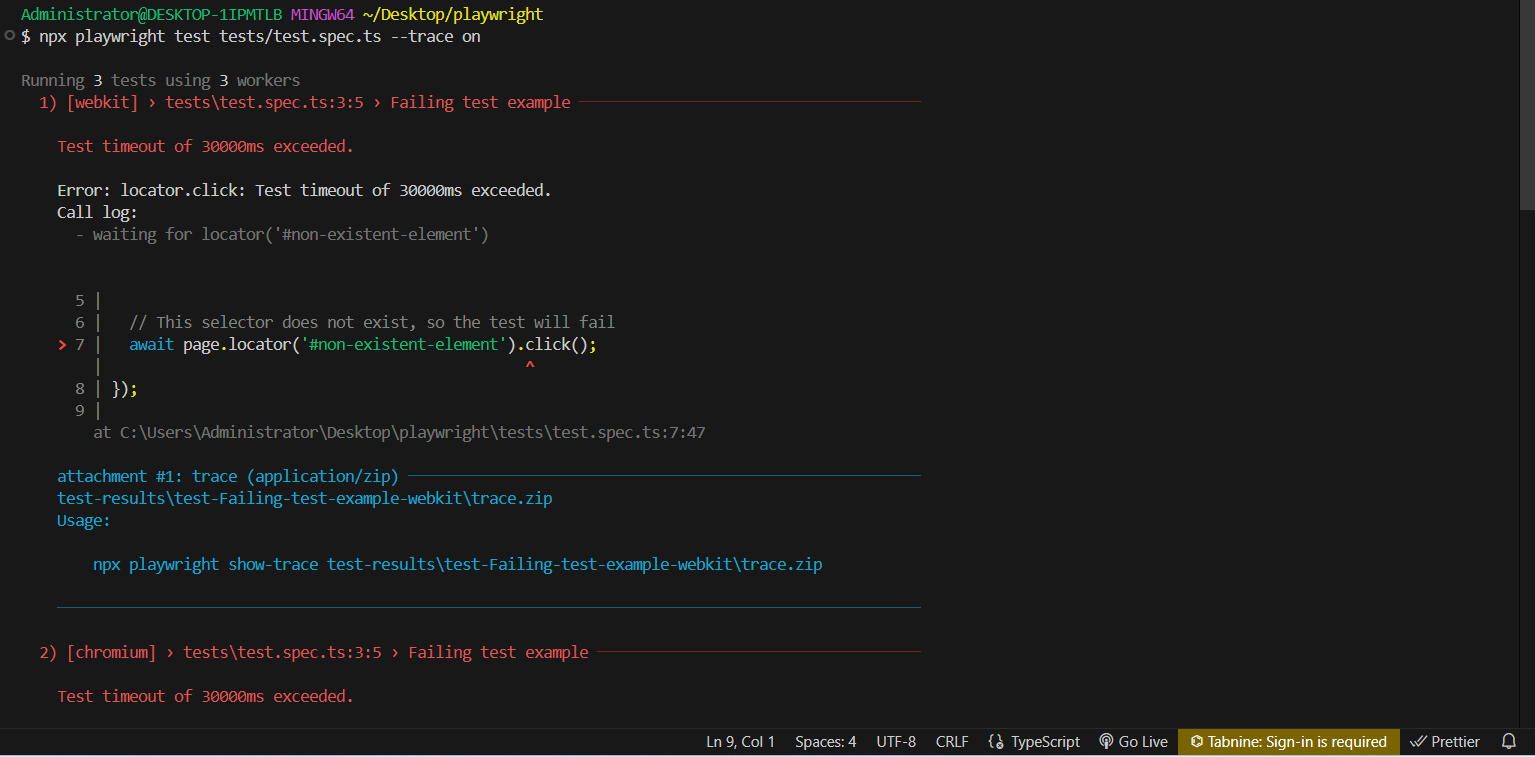
Follow these steps to debug the issue using the Trace Viewer:
Step 1: Open the Trace Viewer
Run the following command to run the test and then view the trace:
npx playwright test tests/test.spec.ts --trace on
or
npx playwright show-trace trace.zip
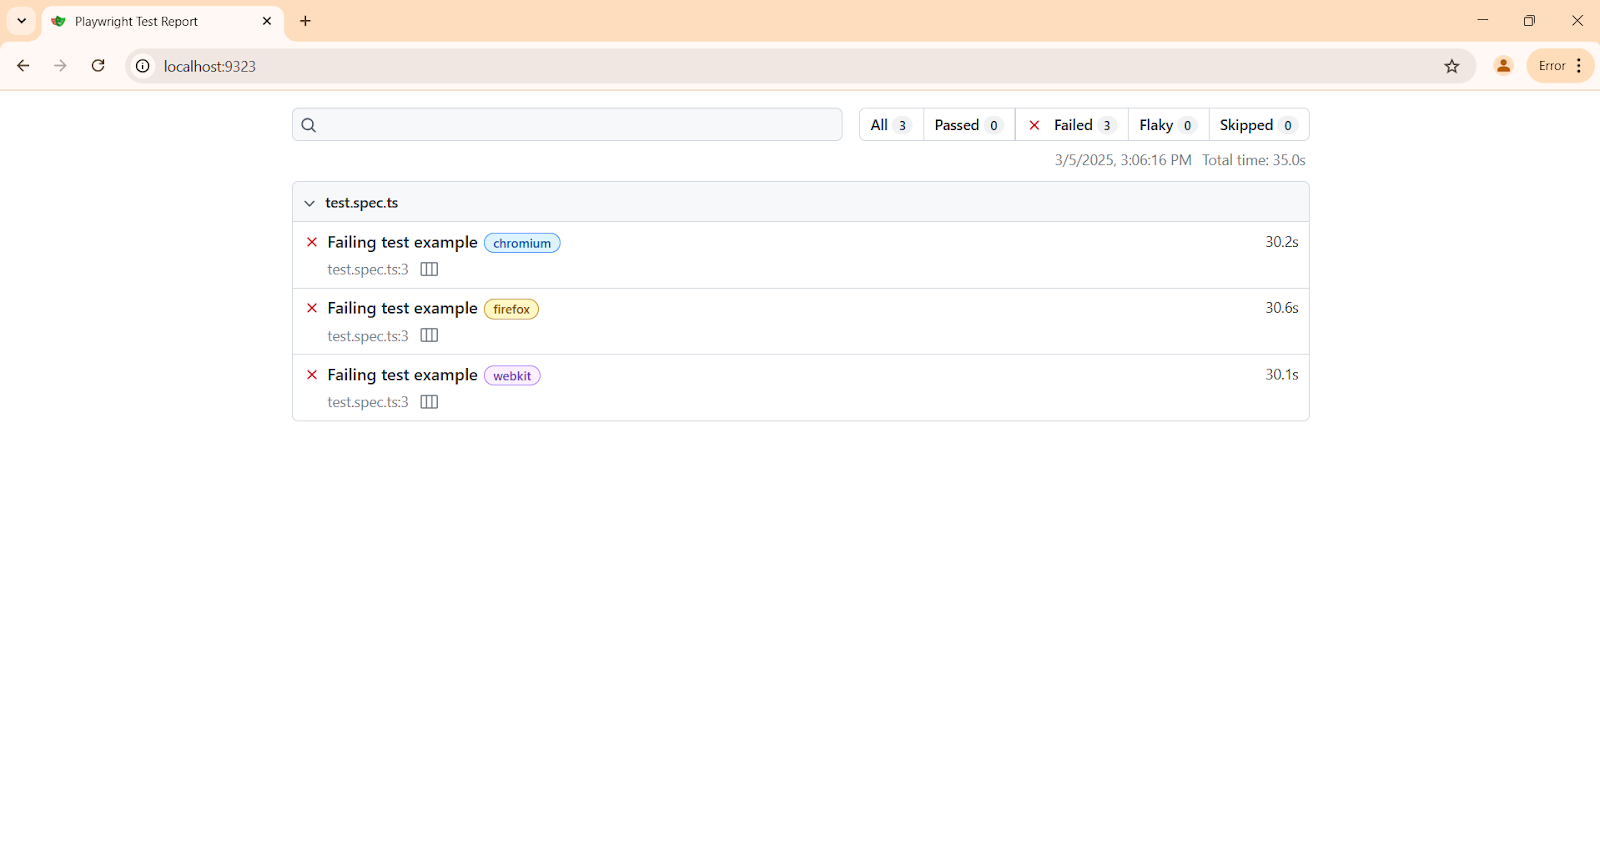
Step 2: Locate the Failing Step
- Inside the Trace Viewer, find the step where Playwright attempted to locate #non-existent-element
- Click on the failing step in the timeline to inspect the details.
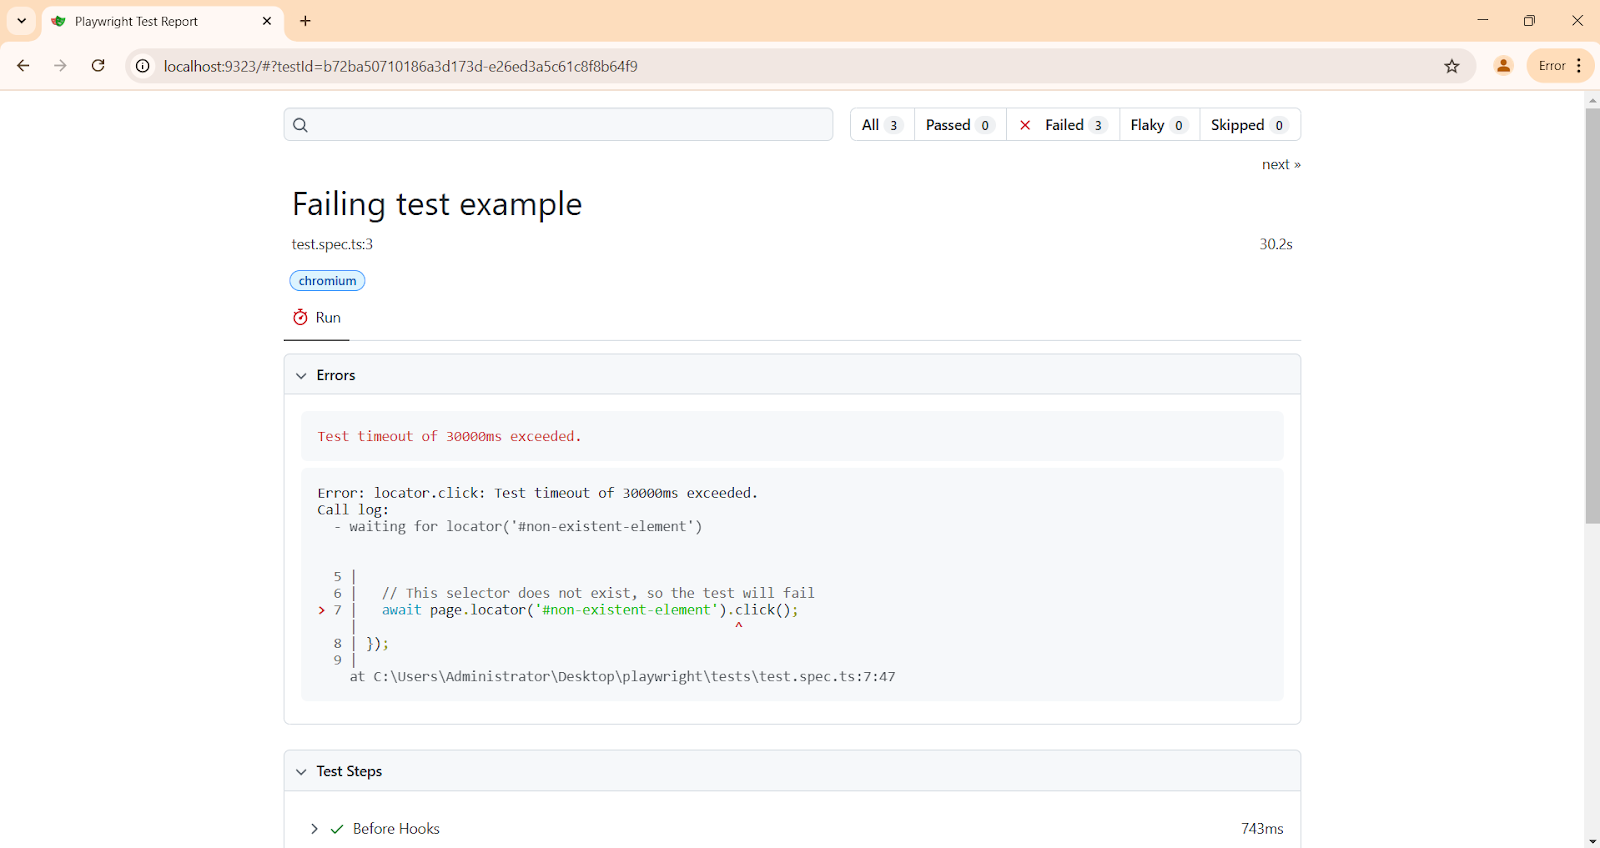
Step 3: Check the Playwright Test Report
- Playwright captures screenshots at each step.
Verify if #non-existent-element was present in the DOM at the expected moment.
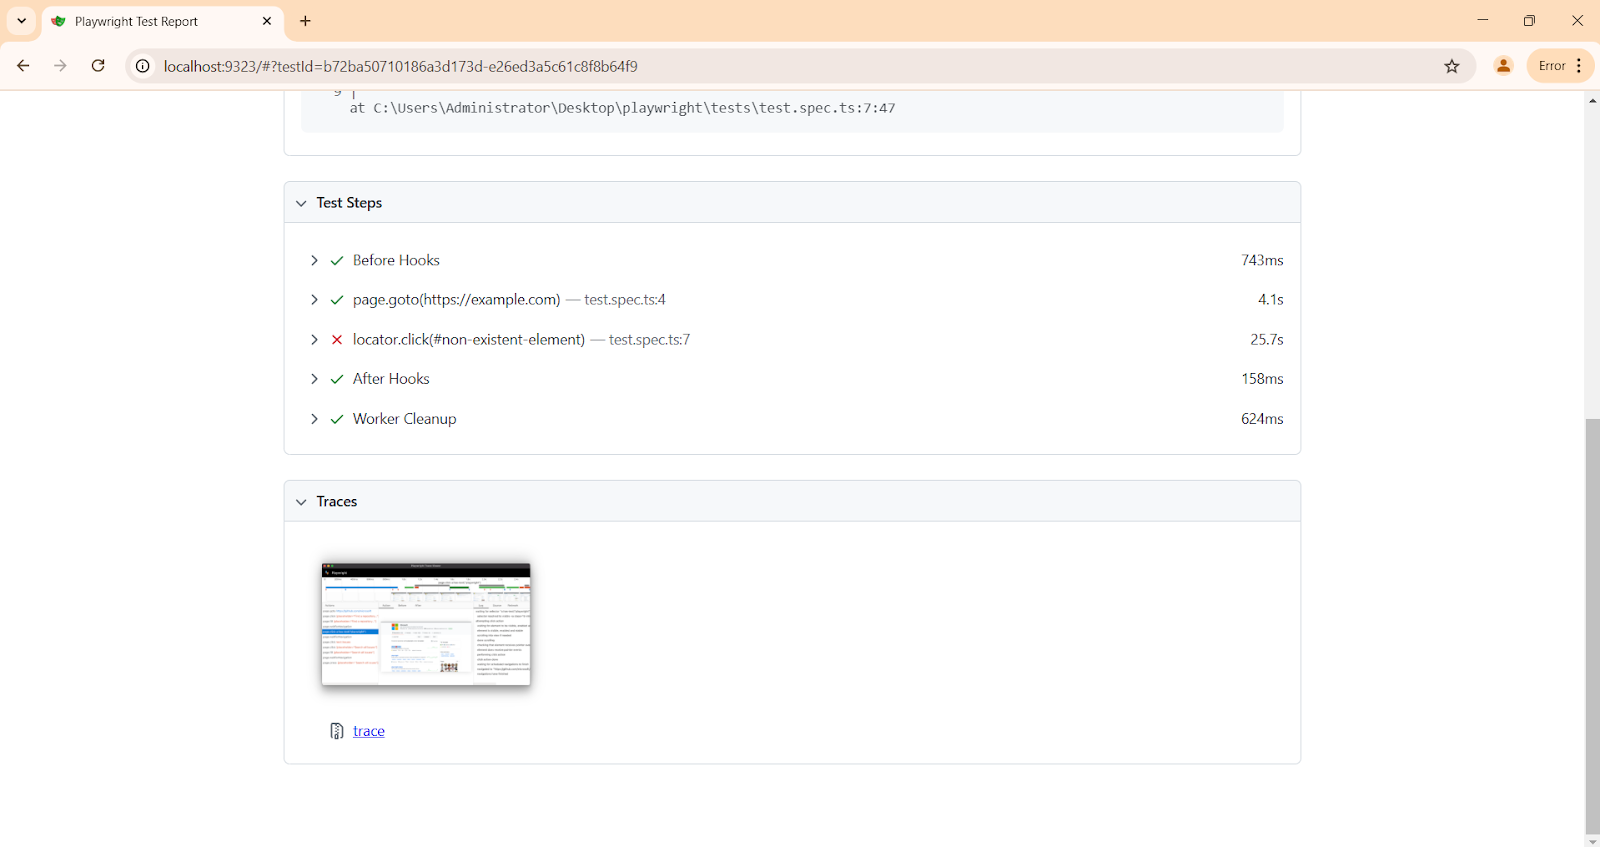
Step 4: Inspect Network Calls
- Go to the Network Requests tab.
- Check whether the API response that loads #non-existent-element was successful or delayed.
Step 5: Use .pause() for Live Debugging
Modify your test and add the .pause() command before the failing step:
test('Debug timeout error', async ({ page }) => {
await page.goto('https://example.com');
await page.pause(); // Pause execution for interactive debugging
await page.locator('#something').click();
});
Run the test again:
npx playwright test --headed
This will launch an interactive browser where you can manually inspect the UI, check element visibility, and debug timeouts in real time.
Step 6: Adjust Timeout or Wait for Element
If #non-existent-element is loading late due to network delays, modify the timeout:
await page.locator('#something').click({ timeout: 10000 });Alternatively, explicitly wait for the element to appear before interacting:
await page.waitForSelector('#something', { timeout: 10000 });Step 7: Re-run the Test and Verify Fixes
Once you’ve made adjustments, re-run the test:
npx playwright test
Check the Trace Viewer again to confirm the issue is resolved.
2. Enable Debug Mode
Playwright provides a DEBUG mode that gives detailed logs of test execution. To enable it, run your test with the following command:
DEBUG=pw:api npm test
This outputs detailed logs of API calls and interactions, helping pinpoint where the test gets stuck.
3. Use .pause() for Interactive Debugging
The .pause() function allows you to inspect the browser at any point during test execution. Add the following code snippet to your test:
// Define a test case
test('example test', async ({ page }) => {
// Navigate to the example website
await page.goto('https://example.com');

// Pause execution to allow manual inspection
await page.pause(); // Execution stops here
});
Run the test, and Playwright will open a browser in which you can inspect elements manually, interact with the page, and debug timeouts visually.
4. Use slowMo for Step-by-Step Execution
Playwright allows slowing down test execution to visually observe what happens before a timeout occurs. Modify the playwright.config.ts file using the following code:
import { defineConfig } from '@playwright/test';

// Export the Playwright configuration with headless mode disabled and slow motion enabled
export default defineConfig({
use: {
headless: false, // Run tests in headed mode
slowMo: 500, // Adds a 500ms delay between steps
},
});
This setting helps in analyzing whether elements take longer to load than expected.
5. Capture Screenshots and Videos for Analysis
Playwright can automatically capture screenshots and videos when a test fails. Enable this in the configuration file:
import { defineConfig } from '@playwright/test';

// Export the Playwright configuration with screenshot and video settings
export default defineConfig({
use: {
screenshot: 'only-on-failure', // Capture screenshots only on test failures
video: 'retain-on-failure', // Retain video recordings only on test failures
},
});
Analyzing screenshots and videos can help identify UI-related issues causing timeouts.
Configuring Timeout Settings in Playwright
Playwright allows you to configure timeouts for different levels of interaction, including locators, actions, and assertions. These settings can be tailored to suit application-specific performance characteristics.
Example: Configuring Locator Timeout
await page.locator('button#submit').click({ timeout: 5000 }); // 5-second locator timeoutThis ensures that Playwright waits up to 5 seconds for the element to become actionable before throwing an error.
Playwright Timeout in Different Browsers
Timeout behavior may vary across different browsers supported by Playwright, including Chromium, WebKit, and Firefox. For instance, WebKit might require slightly longer timeouts due to its rendering engine.
Example: Browser-Specific Timeout
// Define a test case with a specific timeout for Chromium
test('Test on Chromium with specific timeout', async ({ browser }) => {
// Create a new browser context
const context = await browser.newContext();

// Open a new page in the browser context
const page = await context.newPage();

// Navigate to the example website with a 20-second timeout
await page.goto('https://example.com', { timeout: 20000 }); // 20-second navigation timeout
});
Browser-specific configurations ensure consistent behavior across multiple environments.
Best Practices for Handling Timeouts
Timeouts play a critical role in automated testing, particularly when working with tools like Playwright. Properly managing timeouts can help improve test reliability, prevent flakiness, and ensure that test suites run efficiently. Below, we break down best practices for handling timeouts, covering their impact, strategies to balance timeout and speed, and real-world examples of timeout scenarios.
Timeouts are a safeguard in automated testing, ensuring that tests don't hang indefinitely while waiting for conditions that may never be met.
Impact of Timeouts on Automated Testing
Timeouts are a safeguard in automated testing, ensuring that tests don't hang indefinitely while waiting for conditions that may never be met. However, misconfigured timeouts can lead to inefficient testing processes, unnecessary failures, or even overlooked defects.
Preventing Indefinite Waits
Without timeouts, tests may hang indefinitely if an element is not found, a page doesn't load, or an assertion never resolves. Setting appropriate timeout values ensures that tests fail gracefully and provide actionable feedback.
Reducing Flakiness
Flaky tests are a major pain point in automation. Overly aggressive timeouts (too short) can lead to false negatives, while overly lenient timeouts (too long) may mask underlying issues such as performance bottlenecks.
Error Reporting and Debugging
Proper timeout configurations ensure that errors provide meaningful insights. For example, a navigation timeout might indicate slow page loading, while an assertion timeout could signal missing or delayed UI elements.
Best Practice: Tailor timeout values to the context of the test. For example, tests involving heavy data processing or third-party integrations may require longer timeouts than simple UI interactions.
Timeout vs. Speed in Playwright Automation
One of the key challenges in automated testing is striking a balance between timeouts and execution speed. Longer timeouts provide more flexibility but can slow down test execution, while shorter timeouts may increase flakiness.
Dynamic Timeouts Based on Context
Timeout values should be adjusted based on the specific scenario. For example:
- Shorter timeouts for responsive UI actions like button clicks.
- Longer timeouts for actions dependent on network latency, such as API responses or page navigations.
Avoid Overly Generic Timeouts
Applying the same timeout value across all tests or actions can lead to inefficiencies. Use Playwright's configurable timeout options (e.g., global, test-specific, and action-specific timeouts) to tailor settings for each use case.
Parallel Execution Considerations
In parallel testing, excessive timeouts can result in bottlenecks. Use realistic timeout values to avoid blocking other tests while maintaining execution speed.
Example: Balancing Timeout and Speed
// Define a test case to check the visibility of the login button
test('Login button visibility', async ({ page }) => {
// Short timeout for element visibility
await expect(page.locator('#login-button')).toBeVisible({ timeout: 2000 }); // 2-second timeout

// Longer timeout for page navigation
await page.goto('https://example.com/dashboard', { timeout: 10000 }); // 10-second timeout
});
This approach ensures that fast actions like element visibility are handled quickly, while slower actions like navigation have sufficient time to complete.
Real-World Examples of Timeout Scenarios
Timeout challenges often arise from varying application behaviors, external dependencies, or environmental factors. Below are examples and solutions for common scenarios:
Dynamic Content Loading
Applications with dynamically loaded elements can cause assertions to fail prematurely. Use Playwright's expect API with customized timeouts for assertions:
await expect(page.locator('.dynamic-content')).toBeVisible({ timeout: 5000 });Slow Network Conditions
Testing in environments with network latency or server delays may require longer navigation timeouts. Adjust navigation timeout settings for specific tests:
import { test } from '@playwright/test';

// Define a test case to navigate with a custom timeout
test('navigate with custom timeout', async ({ page }) => {
// Navigate to the example website with a 60-second timeout
await page.goto('https://example.com', { timeout: 60000 }); // Increases navigation timeout to 60s
});
Third-Party API Dependencies
Delays or downtime in external services can impact test reliability. Implement retry mechanisms or fallback logic for dependent actions:
// Define a retry mechanism for navigating to a third-party API
let attempts = 0;
while (attempts < 3) {
try {
// Attempt to navigate to the URL with a 10-second timeout
await page.goto('https://example.comi', { timeout: 10000 });
break; // Exit loop if successful
} catch (error) {
attempts++; // Increment attempt counter on failure
}
}
Cross-Browser Testing
Performance differences across browsers (Chromium, WebKit, Firefox) may necessitate browser-specific timeout adjustments. Configure timeouts for each browser environment:
// Define a test case with a specific timeout for Chromium
test('Test on Chromium with specific timeout', async ({ browser }) => {
// Create a new browser context
const context = await browser.newContext();

// Open a new page in the browser context
const page = await context.newPage();

// Navigate to the example website with a 20-second timeout
await page.goto('https://example.com', { timeout: 20000 }); // 20-second navigation timeout
});
Autify’s flexible solutions help you manage timeouts, debug errors, and focus on delivering quality software faster.
Delivering Reliable Automation With Autify Nexus
Handling Playwright timeouts is critical for maintaining efficient and reliable test automation. With tools like Autify Nexus, built on Playwright, teams can leverage advanced AI-powered capabilities to streamline test creation, execution, and maintenance. Autify’s flexible solutions help you manage timeouts, debug errors, and focus on delivering quality software faster.
Ready to streamline your software testing lifecycle? Try Autify Nexus today and experience the power of AI-powered test automation!
.svg)


