
.svg)


Automation testing makes software more reliable. Without it, bugs slip in, updates get risky, and teams waste time fixing problems. By automating testing and deployment, continuous integration and continuous delivery (CI/CD) pipelines expedite the process for smooth, error-free releases.
Playwright is a powerful tool for testing websites in Chrome, Firefox, and Edge. It simulates real user actions so that everything functions as expected. This is enhanced by GitHub Actions, which automates deployment, building, and testing inside a GitHub project.
Using Playwright with GitHub Actions makes apps more stable by helping you find bugs early on. These tools run the tests automatically when new code is pushed, stopping errors from getting into production. For instance, an online store using both tools can verify its checkout process with every new update so that customers always have a seamless shopping experience.
This guide will take you step-by-step through setting up Playwright, creating test scripts, configuring GitHub Actions, and incorporating them into a CI/CD pipeline. By following this process, your web application will operate reliably, reducing bugs and improving performance.
Playwright, developed by Microsoft, is a cutting-edge end-to-end testing framework for automated browser testing
What Is Playwright?
Playwright, developed by Microsoft, is a cutting-edge end-to-end testing framework for automated browser testing. Developers can emulate real user interactions so that web applications perform seamlessly across various browsers.
Key Features of Playwright
- Cross-browser testing: Supports Chromium, Firefox, and WebKit, making it easier to conduct thorough and reliable cross-browser compatibility testing.
- Automated UI testing: Enables smooth interaction with web elements by mimicking real user actions, such as clicking buttons, filling out forms, and navigating pages.
- API testing: Integrates API calls and response validations within a unified test suite.
- Headless mode: Executes tests without rendering a visible browser, enhancing speed and efficiency.
- Auto-waiting: Automatically waits for elements to be ready before interaction, bolstering test reliability.
- Parallel test execution: Runs multiple tests at once for faster results.
Playwright Test Example
The following script directs the browser to the Playwright website, initiates a click on the "Get Started" button, and confirms that the page title contains "Playwright."
import { test, expect } from '@playwright/test';

test('Visit Playwright website and verify title', async ({ page }) => {
    // Navigate to Playwright's official website
    await page.goto('https://playwright.dev');

    // Click on the "Get Started" button
    await page.getByRole('link', { name: 'Get started' }).click();

    // Verify the page title contains "Playwright"
    await expect(page).toHaveTitle(/Playwright/);
});
What Is GitHub Actions?
GitHub Actions is a CI/CD platform you can use to manage tasks, including application testing, development, and deployment, simplifying CI/CD automation. With its direct integration into a GitHub repository, workflows can execute automatically on every pull request.
Why Use GitHub Actions for Testing and Deployment?
- Automates script execution: Deploys apps, runs shell commands, and runs tests.
- Smooth GitHub integration: Operates inside your repository, simplifying setup.
- Cloud-based execution: Runs workflows in a cloud environment provided by GitHub, doing away with the requirement for local servers.
- Scheduled and parallel workflows: Supports scheduled workflows and concurrent task execution, enhancing efficiency.
GitHub Actions supports a number of scripting languages, such as Python, Node.js, and Bash, making it an excellent option for automating Playwright testing.
Why Integrate Playwright with GitHub Actions?
Using Playwright with GitHub Actions makes automated testing easier for developers. Manually testing apps takes too much time and often misses bugs. With Playwright and GitHub Actions, testing is faster, more reliable, and more efficient.
Why Playwright and GitHub Actions Are a Game-Changer
- Automatically tests pull requests: Runs Playwright tests on every pull request to prevent bad code from being merged.
- Finds bugs early: Catches UI issues before deployment, allowing teams to fix them before they become big problems.
- Works on different browsers: Supports Chromium, Firefox, and WebKit so the app looks good everywhere.
- Saves developers time: Eliminates repetitive manual testing so developers can focus on writing better code.
How This Works in Real Life
Let's say a finance company is experiencing UI bugs in production. Everything was manually tested by their QA team, yet they still missed some major issues. Then they started using Playwright with GitHub Actions. Now tests run automatically every time the code changes. This cut production bugs and made updates much faster.
With Playwright and GitHub Actions, testing becomes easier, code quality improves, and developers don’t waste time on manual checks.

Step-by-Step Guide to Integrating Playwright with GitHub Actions
Next, we'll help you install Playwright, set up GitHub Actions, run tests, handle environment variables, and fix errors.
By the end, you’ll have an automated testing setup that checks your web app with every code update.
Prerequisites
Before setting up Playwright, make sure you have the following installed.
- Node.js (latest LTS version, verified with version 20.17.0) – download from nodejs.org.
- npm (included with Node.js, verified with version 10.8.2) – required for package installation.
- Git and GitHub (verified with Git version 2.39.3) – needed for version control and GitHub Actions integration.
Installing Playwright in Your Project
Before running Playwright tests in GitHub Actions, you need to install and configure Playwright.
Option 1: Recommended (Automatic Setup) for a Node.js Project.
Playwright provides a built-in setup that simplifies the installation process.
Open your terminal in your project folder and run:
npm init playwright@latestThis command:
- Sets up Playwright with recommended settings.
- Lets you choose between JavaScript or TypeScript (default: Typescript).
- Creates a tests/ folder with example tests.
- Installs browsers needed for testing.
Run the Example Test
After setting up Playwright, you can run the example test to make sure everything is working.
Open your terminal and run:
npm playwright test- This will test your website on three different browsers (Chromium, Firefox, and Webkit).
- The results will appear in your terminal once the test is finished.
View a Full Test Report
After running tests, Playwright creates a detailed test report.
To open the report, run:
npx playwright show-report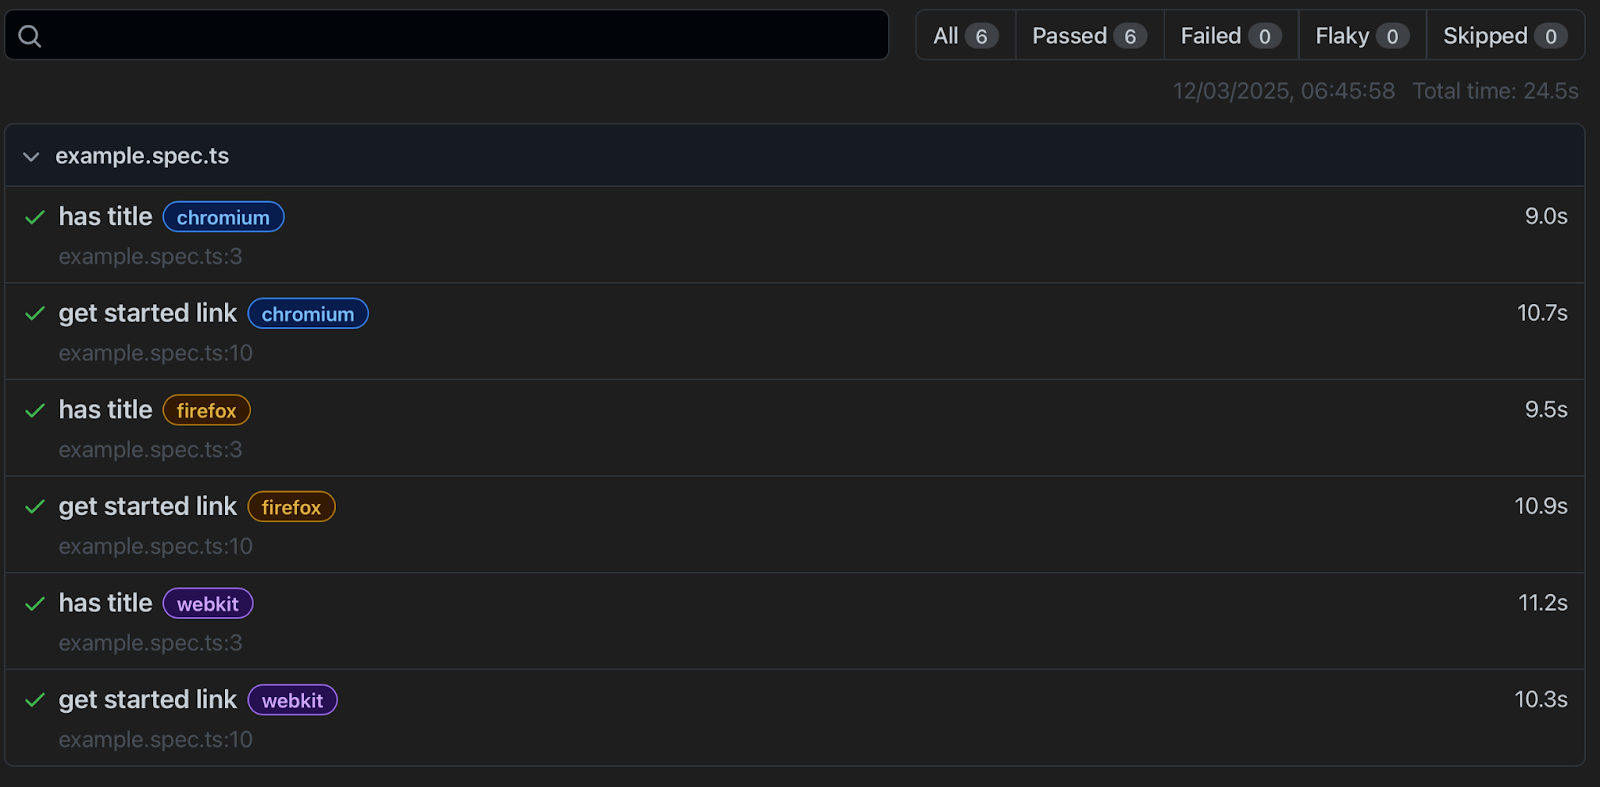
- This report shows which tests passed and which failed.
- You can click on failed tests to see what went wrong.
- The report helps you fix issues quickly before deploying your code.
Option 2: Manual Installation (Alternative Setup)
If you prefer a minimal installation without Playwright’s default setup, run:
npm init -y
npm install -D @playwright/test
npx playwright install
This command initializes a Node.js project, installs Playwright as a development dependency, and downloads required Playwright browsers.
This option is useful when:
- Your team already has a custom Playwright configuration, and you don’t want it to be overwritten.
- You don’t need Playwright’s default files, like .github/workflows/playwright.yml and example tests.
- You’re using Playwright only for specific tasks (e.g integration testing) and don’t want extra setup files.
Create a test folder and test file manually
mkdir tests
touch tests/playwright.spec.js
Now, open test/playwright.spc.js and add this test:
import { test, expect } from "@playwright/test";

test("Check Playwright homepage title", async ({ page }) => {
  await page.goto("https://playwright.dev");
  await expect(page).toHaveTitle(/Playwright/);
});
Verify Playwright Version
The sample code in this guide was tested using Playwright version 1.51.0 .
You can check your installed version with:
npx playwright —-versionRun the Test
Run the test locally to verify that it works.
npx playwright testIf the test passes, you should see the following result in your terminal.
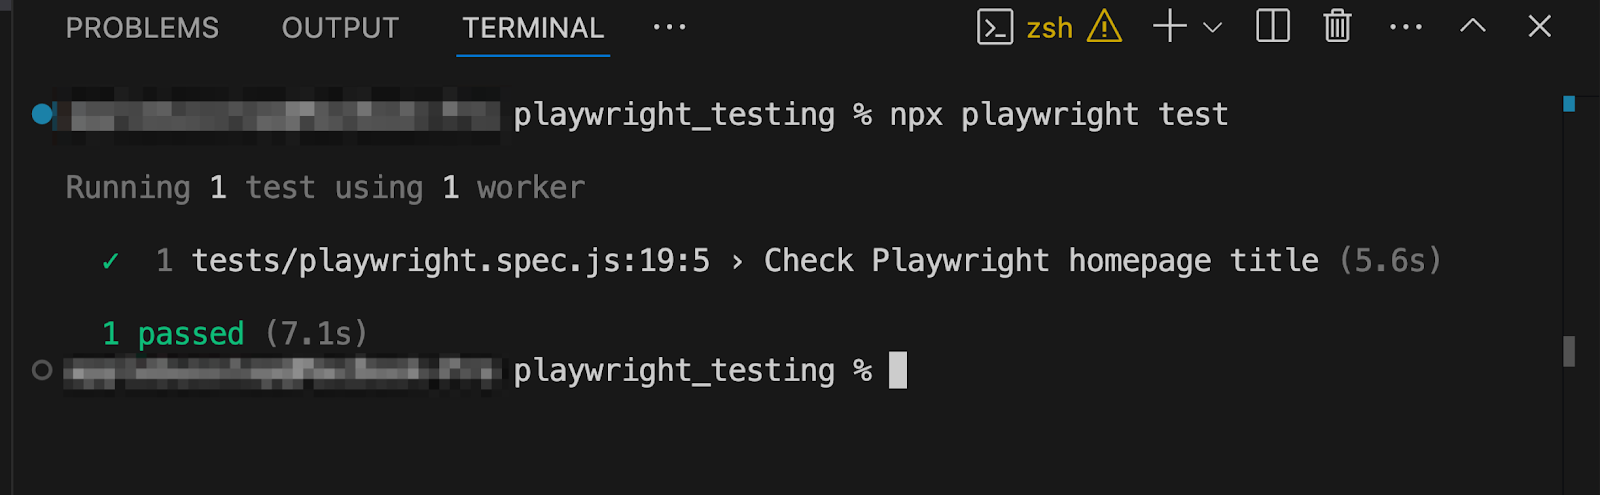
Playwright is set up. Next, automate it with GitHub Actions.
Creating a GitHub Actions Workflow for Playwright
GitHub Actions will run Playwright tests automatically when you push code.
Check for an Existing workflow
If you used npm init playwright@lastest, a Github Actions workflow file may exist at: .github/workflows/playwright.yml
Check this file before creating a new one. If it’s there, you can modify it instead of creating a new one.
Create a Workflow File (If Needed)
Run the following command to create the directory and workflow file:
mkdir -p .github/workflows
touch .github/workflows/playwright.yml
Add the Workflow Code
Open '.github/workflows/playwright.yml' and add the following workflow:
on: [push, pull_request]

jobs:
 test:
   runs-on: ubuntu-latest

   steps:
     - name: Checkout repository
       uses: actions/checkout@v3

     - name: Set up Node.js
       uses: actions/setup-node@v3
       with:
         node-version: 18

     - name: Install dependencies
       run: npm ci

     - name: Install Playwright browsers
       run: npx playwright install --with-deps

     - name: Run Playwright tests
       run: npx playwright test
How This Workflow Works
- Runs on every push and pull request so that new changes don’t break the app
- Sets up the latest Ubuntu environment for testing
- Installs dependencies and Playwright browsers
- Runs Playwright tests automatically in the GitHub-hosted runner
Every new commit should trigger Playwright tests inside GitHub Actions.
Running Playwright Tests in Your CI/CD Pipeline
Once you push the workflow file to GitHub, GitHub Actions will automatically start running your Playwright tests.
To verify the test results, do the following:
- Open your GitHub repository.
- Click on the "Actions" tab.
- Select the latest workflow run to view the test logs.
You should see Playwright running and test results displayed in the logs.
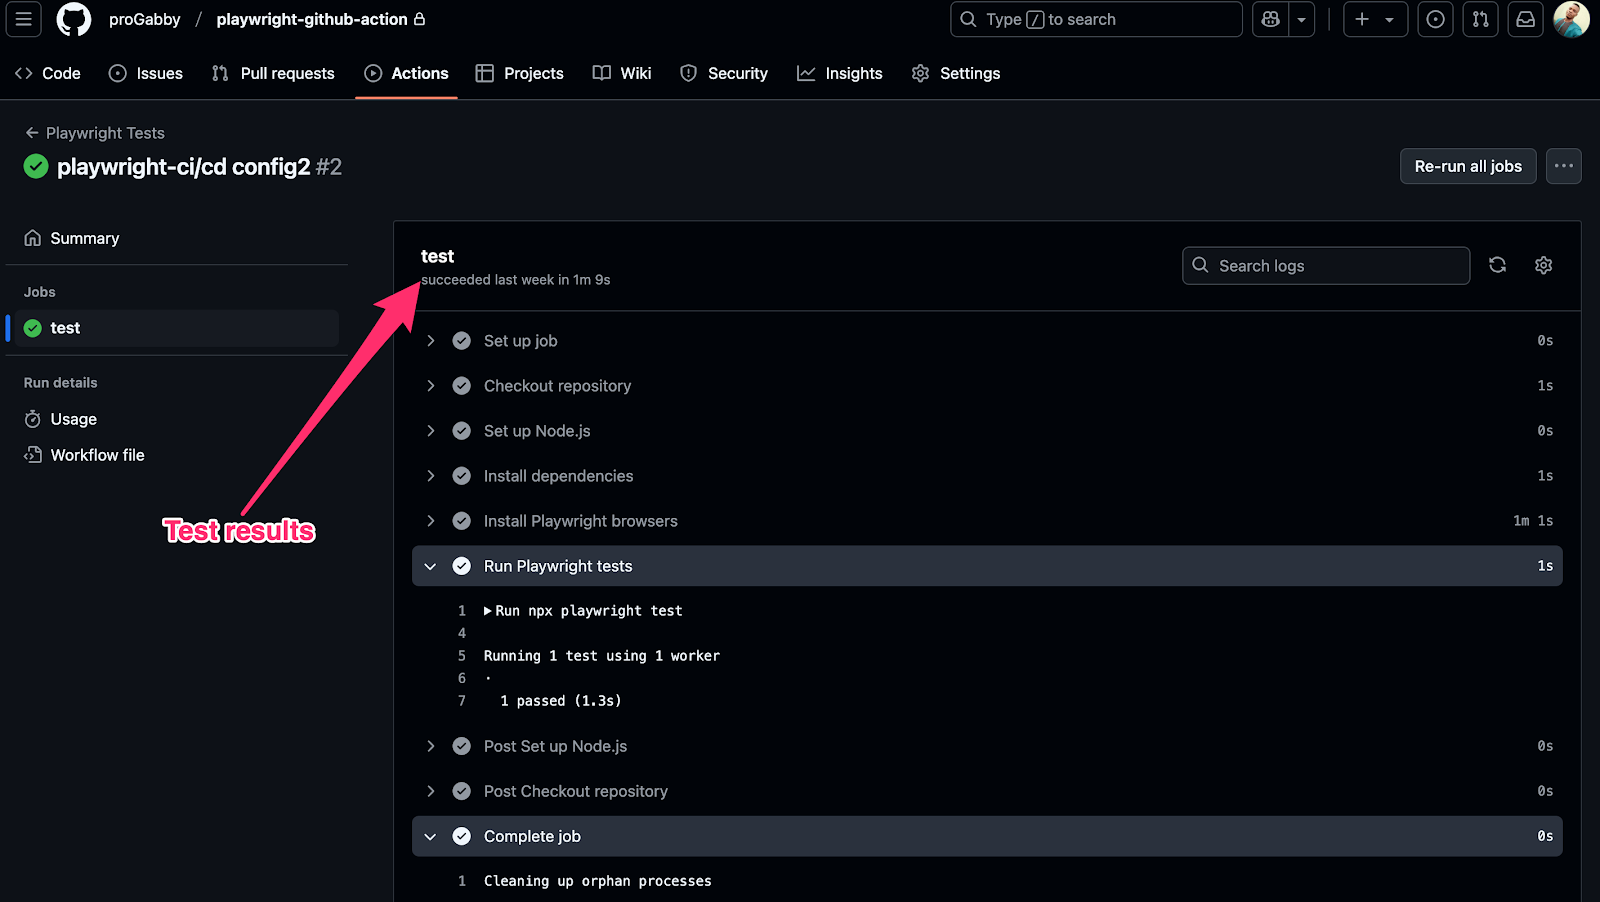
With this setup, Playwright automatically validates your code before merging it into production.
Configuring Environment Variables for Playwright in GitHub Actions
Some tests require API keys, authentication tokens, or database credentials. You should never hardcode these in your workflow. Instead, use GitHub Secrets.
To Store Secrets in GitHub
- Go to your GitHub repository.
- Click Settings > Secrets and Variables > Actions.
- Click "New repository secret" and add your API key.
Use Secrets in Your Workflow
Update your playwright.yml file to include your secret. 'API_KEY' is the name given to your secret key on GitHub Secrets.
env:
  API_KEY: ${{ secrets.API_KEY }}
Next, access the secret inside your test.
test('API key should be accessible', async ({ page }) => {
    const apiKey = process.env.API_KEY;
    console.log('API Key:', apiKey);

    expect(apiKey).not.toBeUndefined();
});
Your API key is now safe and not exposed in your code.
Debugging Playwright Issues in GitHub Actions
Sometimes a test works locally but fails in GitHub Actions. Here’s how to debug it.
Check Logs in GitHub Actions
Go to the "Actions" tab in GitHub and check the logs for error messages.
Run Tests in Debug Mode
To see the test running visually, use Playwright’s built-in UI mode to run the test.
npx playwright test --uiThis will open an interactive UI dashboard where you can do the following:
- Run individual tests
- Re-run failed tests
- View test results
- Inspect traces
It helps to visually debug failures before pushing to GitHub Actions.
Best Practices for Running Playwright Tests in GitHub Actions
Running Playwright tests in GitHub Actions can be slow or unreliable if you don't set it up properly. This can block deployments, delay releases, and waste time.
Here’s how to speed up tests, keep your API keys safe, reduce failures, and maintain cross-browser compatibility in your CI/CD pipeline.
1. Run Tests in Different Browsers
Different browsers render pages differently. Running tests in multiple browsers catches browser-specific bugs.
Use a Matrix Strategy in GitHub Actions
Modify the '.github/workflows/playwright.yml' file to test on Chromium, Firefox, and WebKit at the same time.
name: Playwright Tests

on: [push, pull_request]

jobs:
  test:
    runs-on: ubuntu-latest
    strategy:
      matrix:
        browser: [chromium, firefox, webkit]

    steps:
      - name: Checkout repository
        uses: actions/checkout@v3

      - name: Install dependencies
        run: npm install

      - name: Install Playwright browsers
        run: npx playwright install

      - name: Run Playwright tests
        run: npx playwright test --project=${{ matrix.browser }}
This works for the following reasons:
- Finds browser-specific issues early
- Runs tests in parallel, saving time
- Verifies that your app works for everyone
2. Always Run Tests Locally First
Always run Playwright tests locally before pushing to GitHub to catch issues early. You can use the following to debug efficiently, saving CI/CD time and preventing unnecessary failures:
npx playwright test
npx playwright test --headed --debug
3. Use the Latest GitHub Runner
Use the 'ubuntu-latest' in '.github/workflows/playwright.yml' file for faster execution, improved compatibility, and stability.
Keeping the GitHub runner updated makes sure that dependencies are current, reducing errors and optimizing CI/CD performance in Playwright testing.
4. Secure API Keys Using GitHub Secrets
Never hardcode API keys. Use GitHub Secrets to keep them safe. Just reference them in workflows and access them in Playwright tests. This keeps credentials encrypted, prevents leaks, and follows security best practices for CI/CD.
Using Playwright with GitHub Actions makes software testing faster, easier, and fully automated
Streamlining Testing with Playwright and GitHub Actions
Using Playwright with GitHub Actions makes software testing faster, easier, and fully automated. Tests run automatically each time you update your code to verify that everything functions properly across different browsers, detect errors early, and enhance code quality.
To get the best results, always test locally before pushing, keep API keys secure with GitHub Secrets, and run tests in parallel to save time. Following these steps will help you automate testing, speed up development, and avoid costly bugs. Want to improve efficiency? Create a test using Playwright and integrate it with GitHub Actions to make the testing process effortless!
Looking to simplify and scale your automated testing even further? Try Autify Nexus for fast, flexible browser testing build on Playwright—no complex setup required.


