Introduction

Record-and-playback (capture/replay) is one way to createtest scriptsfor test automation. The automation system records user action and converts it into a test script so that it can repeat the action flow (playback). Beginners can use it intuitively, as they don’t need any programming knowledge to make test scripts. However, it tends to receive criticism from automation engineers who have some experience. For example, the title of Chapter 2 of the book ‘Software Test Automation: Effective Use of Test Execution Tools’bluntly says ‘Capture Replay is Not Test Automation.’

If you don’t know better, it is tempting to think that the quickest way to automate testing is to simply turn on the record facility of a capture replay tool when the tester sits down to test. The recording can then be replayed by the tool, thereby repeating the test exactly as it was performed manually. Unfortunately, many people also believe that this is all there is to test automation. We will show you why this is far from the truth.

Fewster, Mark, and Dorothy Graham. “Capture Replay Is Not Test Automation.” Software Test Automation: Effective Use of Test Execution Tools, ACM Press, p. 26.

Meanwhile, we have taken the record-and-playback route with our test automation platform, Autify. Not only that, many teams working to improve E2E testing have adopted this method. This includes test automation services similar to Autify that have emerged in the past few years and OSS’s.

This begs the question, why has record-and-playback been subjected to so much criticism? And how can we solve the shortcomings with the record-and-playback method? In this article, I will illustrate the main criticism against record-and-playback and its inherent problems and how Autify is attempting to solve them (or has already solved them).

What gets forgotten with simple auto-recording tools

The most significant advantage of Record-and-playback tools is that anyone can write automated test scripts, regardless of whether they have specialized knowledge. In other words, even if you don’t know HTML/CSS or how to use developer tools on your browser, you can write automated test scripts as long as the tool can be installed.

In other words, record-and-playback tools allow people with no technical knowledge to mass-produce an endless number of automated test scripts. That is to say, people could call any script that was automatically recorded “automated test” without any consideration of test code management or maintainability.

In automatically recorded test scripts, what gets recorded is merely the result of what the user did. For example, suppose you are entering text into an input form. There is text already in the form, so you hit thebackspacekey to delete it. If the action is recorded as is, it will look like this:

  • Click theinputelement
  • Press thebackspacekey five times
  • Press”H” “E” “L” “L” “O”keys

(This is an example for illustration purposes. I’m not trying to say that all tools record in this way.)

A test script like this will fail if the input form has more than six characters. This is because it only recorded that the user pressed the backspace key five times, so any characters beyond that will not be deleted. The user must have intended to empty the input field by deletinganyexisting text.

Even if you don’t have experience with automated tests, you may have experienced a similar situation, such as when you tried to record a macro in Excel to automate admin tasks. For example, instead of [select any cell with data], Excel may record it as afixedselection like [select cells in the range A1 to C55]. The next time you run this macro, it will not behave as intended.

Also, humans often can’t understand automatically recorded test scripts. For example, a selector likediv > div > div > p > span > span > adoes not show what it means. In programming, this is like a source code consisting only of magic numbers. Also, implicit actions like scrolling may be recorded in absolute values, such asscrollTo(47,564). Because of these unreadable locators and noise, auto-recorded test scripts tend to be incomprehensible and unmaintainable.

If we use auto-recorded test scenarios as is, it’s likely to fail from the second execution onwards. To avoid failures, we have to maintain the test script on an ongoing basis. Unfortunately, when test scripts are too difficult to understand, people either run them once or abandon them when they stop working.

In auto-recorded tests, verification is also often forgotten.

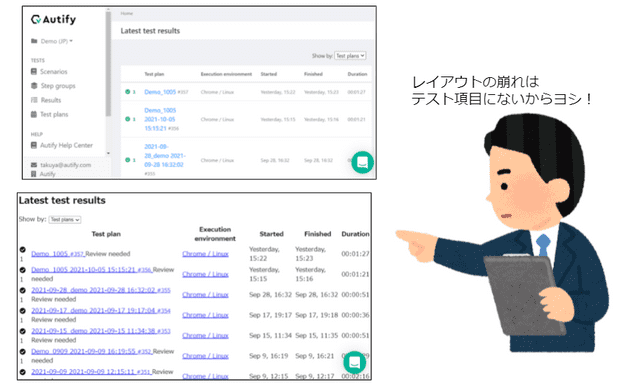
Of course, many record-and-playback tools can verify text within a webpage. However, verification criteria are often quite strict. For example, it can only check whether the page contains a specified text or whether an element is displayed. Even if it’s something obvious to humans, such as broken designs, it gets completely ignored by CSS selectors that identify elements. For instance, automatically recorded scripts don’t check whether the company logo is displayed correctly or whether the layout hasn’t unintentionally been changed from a 3-column design to a 2-column design.

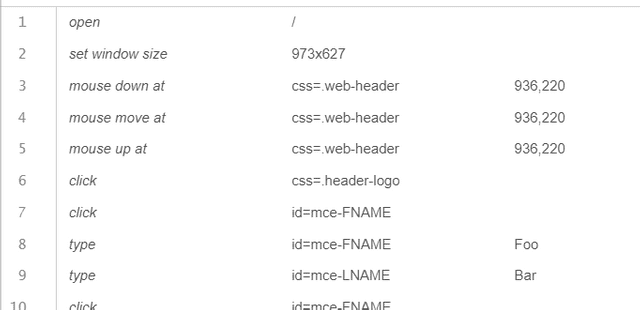
People have hoped that test scripts auto-recorded with record-and-playback tools would be an exact replication of what humans do and free us from repetitive tasks. However, the original purpose and perspectives of the test scenario get lost in overly simplistic automation, turning the script into a rigid and unintelligent bot. Of course, you could rewrite the auto-recorded locator to better reflect your intention or add comments to the script to make it easier for you to understand later. But don’t you think this isn’t much different from manually programming a test code?

You need experience to write readable test code

Should we give up using record-and-playback tools and just go back to writing test code? It’s not that simple.

Personally, one of the biggest pain points with writing test code is that you often have to maintain both the application code and test code. For example, every time you change the element’sidorclass, you also have to change the corresponding test code. You could save yourself the trouble by specifying a text or accessibility ID as the locator or giving it a unique test attribute, such asdata-test. However, this doesn’t change the fact that you still have to manage both the application code and test code.

In addition, sometimes you can’t tell what the test code means from the test code alone. For example, if you have a locator calledbutton[type= “submit”], it’s difficult to guess which element in the screen the locator points to by merely looking at the test code. This is because nothing in the test code shows what the screen looks like at that point in time. To solve these issues, we use practices like the Page Object Pattern to manage UI components and their locators together. However, the more you try to structure your test code to reflect the structure of the actual UI, the more it will overlap with your application.

We could refine automated tests by sharing parts that are common between the application code and test code (StoryBook is a handy tool for this). Some teams may consider investing in code-sharing initiatives. However, this would require considerable resources, and more importantly, it wouldn’t be possible without engineers with sufficient skills, experience, and passion in both development and testing teams.

One of the biggest advantages of record-and-playback tools is that they are perfect for existing software tests. Writing test code makes sense if you start the development process by writing tests for software that does not yet exist (BDD, or Behavior Driven Development, is one such example). If not, you would have to repeatedly look up the locator of the target element in the browser, copy & paste the locator into the test code, and run the test code and see if it works as expected. The more lines there are in the test code, the harder this process gets.

How we can improve record-and-playback tools

To summarize, simply recording user actions will give you unstable and unreadable test scripts. Writing readable and maintainable test codes requires significant investment, including improvements to the development process. From personal experience, I’ve found that many user companies take the latter approach. For example, they hire a dedicated test automation engineer (Software Engineer in Test) who works with other developers and the QA team to build an automated test architecture.

What about record-and-playback tools? Have they remained unchanged for the past five years? Not at all! Let’s look at some of the challenges that record-and-playback tools face and how Autify has overcome them.

No visualization required

Whether it’s test code or a record-and-playback script, maintenance becomes more and more tedious if users have to use their imagination when deciphering the test code. In other words, users shouldn’t have to visualize the actual screen when reading the test code.

As the name suggests, Record-and-playback tools allow you to replay recorded actions, so you could read the code by executing the steps yourself. However, I’m more interested in improving the readability of the code itself. As an example, scripts recorded withPuppeteer Recorderused Accessibility ID like this:

const{open,click,type,submit,expect,scrollToBottom}=require(‘@puppeteer/recorder’);

open(’https://github.com’,{},async(page)=>{

awaitclick(‘aria/link[name=“Sign up”]’);

awaittype(‘aria/textbox[name=“Enter your email e.g. [email protected]”]’,‘[email protected]’);

awaitclick(‘aria/button[name=“Continue”]’);

awaittype(‘aria/textbox[name=“Create a password”]’,‘asdffdsa’);

Unfortunately, Puppeteer Recorder was an experimental project and isn’t maintained anymore. However, you can write test scripts that are visually easy to understand by using accessibility attributes such as Accessibility IDs. It also has the added benefit of raising awareness of accessibility. I hope other projects and OSS will inherit this practice in the future.

Meanwhile, Autify uses screenshots. Test scenarios recorded on Autify are saved with a screenshot attached to each step.

Scenario editors that show screenshots are a simple concept that anyone could have come up with. It’s something Autify is secretly proud of… See it for yourself! Just by having a screenshot, you can intuitively understand what’s done in that step, saving you the trouble of adding comments in the test script. You no longer have to look at the test code and visualize what the screen looks like, or add breakpoints in the script and run the test line by line to check its behavior.

You can also give each step a name and detailed information. It may seem simple, but when there are steps where the purpose isn’t obvious, adding a little explanation can substantially improve readability down the line.

Of course, you could also run the recorded scenario directly on your local Chrome browser, which is helpful when you want to run the test and see how it behaves.

Prevent noise in the test scenario

What about removing extra steps like scrolling and deleting characters? On Autify, the following processes internally, even for simple actions like text input, for example:

  • Automatically scroll so that the target element is near the center of the screen
  • Focus on the target element
  • Clear the text in the input form before entering text

These processes are bundled into the[text input]step, so the user won’t know they are there. This allows users to create test scripts without making each step’s intention unclear (for example, “press the Backspace key five times”).

If you’re an engineer, you would know that even clever tools sometimes do not work correctly. Autify is no exception, and we are constantly working to improve our platform to support a variety of UIs! If you find anything that doesn’t work during the trial period or during your paid contract, please contact us 🙂

Element search

Locators recorded with the record-and-playback method can be unstable at times. Although there are several ways to identify elements, such as by specifying the text of an element (textContent, value, etc.) or internal attributes such asid, there is no way to determine which method is the most stable while recording. On some websites, even theidmay not always be static.

On Autify, it’s up to the platform to decide how an element is found in each step. When recording a test scenario, Autify stores various metadata about the element and the surrounding elements and uses these as the basis for element search. Simply put, it searches for elements based on the following information and finds the one with the best match:

  • Tag name
  • Attributes such as id and class
  • Text
  • Parent and sibling elements
  • element coordinates
  • Absolute path

This method helps make sense of recorded locators and improves stability, which is one of the drawbacks of the record-and-playback method. Even if theidorclassis not static, elements can be found by searching for other characteristics such as text or surrounding elements. Furthermore, information about the found elements is updated each time, improving stability each time you run the test.

Mimic the human eye

Let’s briefly talk about Visual Regression Testing, which is currently beta tested. This feature shows you how much the screen under test has changed from before. This is useful for detecting various issues, such as broken CSS layouts and text changes. It used to be difficult to automatically detect changes obvious to humans, but you’ll soon be able to automate that too!

Future challenges

Finally, let me give you a sneak peek of what Autify is planning to do in the near future. We’re not ready to give you the details yet, but we do have a few updates planned for element search.

Search for elements based on appearance

A frequent problem with E2E testing web apps is that tests can fail due to change in internal implementation, even if the website itself doesn’t appear to have changed. As discussed above, we can solve this issue by searching for elements based on various information, but it’s not perfect. For example, even if an image looks the same, the test tool may not identify the correct element if the image URL changes.

We are currently considering a feature, Visual Locator, which finds the element that matches the recorded element’s appearance. This feature should help avoid the issues outlined above and identify elements closer to what the user intended.

Search for the element that is closer to what the user intended

Another common problem is that the test scenario does not reflect the user’s intention, i.e., what the user was trying to do with a specific action. For example, if a user clicks a blog article, there is no way of distinguishing whether they want to clickan article with a specific titleoran article at the top of the page.

However, Autify keeps track of a lot of information about elements that are clicked on, such as which position the element was in a list element. For example, the test scenario could reflect the user’s intention if there was a mechanism that allows users to give “hints” for searching an element. This is especially useful in situations where there are many similar elements.

Another way is to show several potential elements in the test result so that the user can choose the correct one. By analyzing the feature values of the element that the user selected, Autify can determine which feature is most important when searching the element. Then, Autify should be able to find the intended element more consistently in subsequent test runs.

Summary

At Autify, we continue to evolve our platform towards a more ideal test automation tool based on user feedback and reflecting on existing issues with record-and-playback tools. If you’ve had a bad experience with other record-and-playback tools, I strongly suggest trying Autify. If you are interested,

please request a free demo from our official website!